If you have created even one photo with a digital camera you are already aware that what you see is almost never what you get. This is due to several factors.
First of all, the lens can geometrically affect the field of view because it mostly differs from the field of view our eyes have. But that is the least of a problem.
The biggest difference is in the contrast, more precisely in the difference between the shadows and highlights.
Camera vs. Eye
Camera sensors, whether they are CCD or CMOS, aren’t able to gather the same information our eyes do. Yes, there is big improvement lately and the dynamic range has indeed expanded significantly with the newer models of professional cameras, but that is still far away from the ability our eyes and brain have.
This is more due to the nature of how we perceive things. Our brain adjusts eyes for each thing in particular and then makes a collage out of the information it has, thus getting the perfect range. Sensors, on the other hand, work quite differently and they aren’t equally sensitive to different light intensities, thus creating issues with dynamic range.
High Contrast Scenes
These issues are mostly felt in high contrast scenarios, where you have extremely bright light source peaking through something that hasn’t been lit from the other side. Take the sunset, for example. If you try to photograph a sunset, you’ll see that the camera will expose properly for the sun but everything else will be just a silhouette. However, our eyes see detail in the surroundings while still seeing the sun as it is supposed to be.
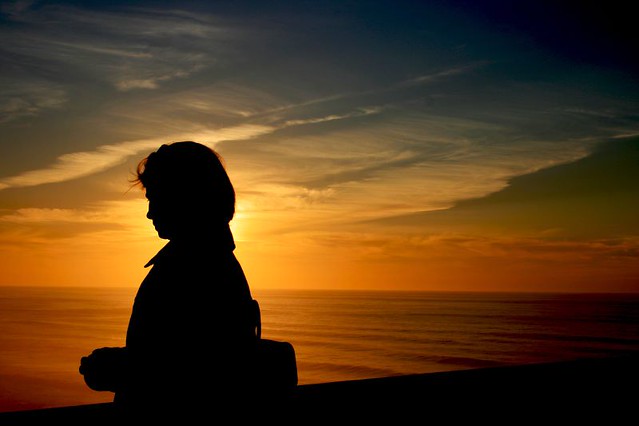
Photo by Francisco Antunes
This “handicap” the sensors have can often prove frustrating for photographers. That is why many photographers who tend to photograph things where dynamic range is of great importance change cameras too often. Every EV of dynamic range they get helps them accomplish their idea.
Better Dynamic Range Brings Out More Detail in the Photo
In general, more dynamic range means more detail in the picture. With it comes better color distribution and tonality and, all in all, a better image. Having all that dynamic range at your disposal leaves much more space for tinkering with the RAW data, bigger extremes without great loss of information and detail, smoother skin tones, proper light distribution and so on.
More often than not, better dynamic range goes hand in hand with less image noise, which is an added bonus.
Read more: 6 Simple Ways to Extend the Dynamic Range of Your Photos
Better dynamic range also affects videographers who use DSLR cameras to shoot video. Most of them aren’t able to recover detail from RAW data since getting your hands on RAW video is fairly complicated and expensive. Videographers are limited to the regular output, therefore they need a great deal of dynamic range to begin with.
Luckily, there is the Raw format and the HDR technique to counter the issue that every sensor will have.
Raw Format: For More Dynamic Range
The Raw format is essentially all the data the sensor gathers packed in one file that is about 10 times the file size of the equivalent JPEG. By using the RAW file in a software which can develop it appropriately, such as Photoshop, Lightroom, Aperture, etc, you can tone down the highlights while gathering detail there, and brighten the shadows which essentially increases the dynamic range of the image.
Read more: How to Create an HDR Image From a Single Raw File in Photoshop
This isn't all perfect, however. Toning down the highlights doesn't provide all the detail you would get if you exposed properly for the highlights. And clipping up the shadows increases the amount of noise accordingly, since there is less signal the noise gets amplified quite a lot. You will get higher dynamic range but there will be some lack of detail and some more noise. It is still better than the reduced dynamic range you get by default.
High Dynamic Range (HDR) Photography
HDR photography, on the other hand, requires multiple exposures, usually separated by 2 EV of exposure and at least 3 frames. This allows you to blend the 3 images together in order to get at least double the amount of dynamic range. However the process is fairly complicated and takes a whole lot of practice to master. It can’t be applied to every situation and will often result in unexpected outcomes (both positively and negatively).
Read more: 4 Tips for Creating Compelling HDR Photography
Photo by Artwear Revolution
As most of the cameras allow for auto bracketing by set amount (you can tell the camera how far apart you want the images) it is hard to get images that don’t have any motion between frames thus effectively avoiding ghosting. And another thing: you practically have no idea how it would look like until you post process the image. That means you are going back to the film age of shooting, in a way – you have no idea what you have shot until you develop it.
Read more: 5 Important Tone Mapping Tips That Will Improve Your HDR


