There is no shortage of ways to add interest and drama to your photographs using Photoshop, but giving them a cinematic feel is one of the more timeless ways to adjust the tones. The technique gives them an almost muted feel, the colors aren't so bold, skin tones look smooth and milky, it's just an overall softer and more inviting appearance. The entire treatment can be done in just a handful of steps using Photoshop, even less if you turn the steps into a Photoshop Action that you can tuck away for future use.
Now, keep in mind that everyone's taste and opinion will vary on which tones they prefer, so feel free to experiment in the steps below to get a tone that appeals to you. You will also find that the tones will also be slightly dependent on the story that is being told within the photograph–that's something you'll want to take into consideration.
Here is the image we'll be working with throughout this tutorial, feel free to download it from Flickr to work along or choose one of your images to work on.
Ready, Set, Action
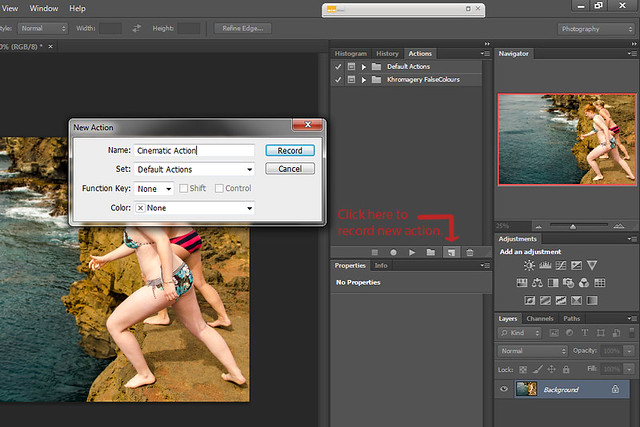
At this point, we're going to start recording an Action so we can save our steps for one button access in the future.
1. To do this, simply open the Actions Palette and click on the Create New Action button. It looks like a sheet of paper with the bottom left hand corner folded up.
2. When the popup appears give your new action a name such as Cinematic Effect, be more specific if you see fit. Here you can also assign the action a set of hotkeys by selecting a function key to assign it to but this is optional. Click Record.
3. As soon as you click Record, Photoshop will record all the adjustments you make. We'll need to stop recording once we are done editing but we'll cross that bridge when we get there.
How To Record An Action
Working with Adjustment Layers
If you're not familiar with Adjustment Layers, don't fret, they're nothing to be afraid of and this will be a good way for you to learn how to use them.
1. In the Layers Palette, click on the Add Adjustment Layer button located near the bottom. Select the Hue/Saturation option. Now move over to the Hue/Saturation Palette and drop the Saturation slide down to mute the colors slightly. I've set mine to -36.
2. Next let's add a Curves Adjustment Later. Now, move over to the Curves Palette, click the drop down box that says RGB and select Red, play around with the curves until you come across a tone that like. I set mine to a very slight “S” curve. We'll do the same for Green (I just raised the midtones a bit) and for the Blue, which I made another S curve for. Look at the image below to see exactly how I adjusted mine, try to simulate them the best you can, or feel free to experiment on your own.
3. Now, we're going to add a color overlay to give the image a sun-kissed look, to do this add a Solid Color Adjustment Layer, when the color picker pops up settle on a golden color. I used #ad8841 you can type that number in or find a color on your own. Now, change the Blending Mode to Hard Light and bring the opacity down to a more acceptable level. I put mine all the way down to 9%.
4. One last Adjustment Layer. Let's make some small changes to the Brightness and Contrast. Create a new adjustment layer and change the Brightness to -14 and the Contrast up to 30.
Now that we're done with the Adjustment Layers, go back to the Actions Palette and press the Stop button. It is the Square shaped button right next to the Red Record button. Next time you want to add these effects to a photo, just select it from the Palette and click the Play button. Photoshop will automatically process the adjustment layers for you. They can then be fine tuned by selecting the adjustment layers in the Layers palette and applying your tweaks.
Special Effects
I like where the colors are in the image, but I'd like to add something to really make the girls pop off the screen and make them the focus. To accomplish this I'm going to use a Layer Mask to blur out some of the effects. Go ahead and duplicate the Background Layer, just make sure it stays beneath the Adjustment Layers.
With the duplicated Background Layer Selected, go to Filters>Blur>Gaussian Blur. When the pop up menu appears bring the slider up to about 4.3 and click OK.
Now, with the Background Duplicate still selected add a Layer Mask by click the layer mask button at the bottom of the Layers Palette. Choose the Paintbrush Tool and make sure the color Black is selected as the Foreground Color. Paint around the two girls to brush off the Blur effect from them. I did this quickly for the sake of time and this tutorial so you may see some not so perfect edges, but feel free to get as detailed as you'd like. It's easiest to zoom in closely so you can get a good look at what you're doing. I also brushed out the blur on the ground immediately underneath the two to make it more realistic.
Cropping
This step is optional, but if an image you are working can be cropped down it can be a nice touch to do so at a widescreen ratio like those we most often see in films. So, to crop the image down to a more cinematic scale you'd crop to a 16:9 ratio which is typical of a widescreen movie. I have this as a preset in Photoshop already so I just choose it from the menu and Photoshop automatically gives me a crop box that is confined to this aspect ratio. If you don't have this preset, simply plug the numbers in the Proportions Boxes then click Save Preset from the drop down menu.
That's A Wrap
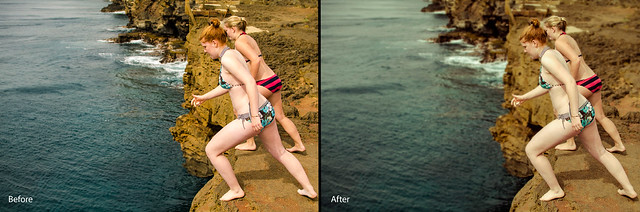
Before and After; The Changes Are Subtle Improvements
Once you've finally settled on the correct changes, save your image and that's it, you're all set. All that's left to do is save your image and share it with the Light Stalking Community.


4 Comments
Love it!!! Thanks!!
Very simple tutorial to produce a great visual effect. I love how it focuses your eyes on the subjects.
Great work and thanks for sharing.
My first and final thought; how high up are those girls?!
Rupert, they’re 60-foot up! Quite a leap into the ocean! 🙂