Hands up. How many of you first got into photography because you were wooed by a camera with lots of buttons and dials?
I was, the Zenit 11, a chunky Soviet SLR made from pig iron and rivets but it had buttons, dials and levers. The fact that I had no idea what any of them did was irrelevant, it looked good. So today, and aimed squarely at those who are just getting into photography, we present a guide to the dials, buttons and levers on your camera.
So Let's Uncover The Basics Here
The Shutter Button:
You know what this does, press it and it takes a picture. However, as well as the obvious function, it conceals a couple of other vital operations that you should know about. When you press the shutter halfway, that is to the point of triggering but not going on to take the shot, the camera locks both the exposure and the focus.
This is an important thing to know because it allows you to focus on a particular subject with a half press, recompose the shot by moving the camera then continuing the shutter press. The original subject will remain in focus no matter where you are pointing the camera (providing the subject hasn't moved of course).
The Mode Dial:
Somewhere near the shutter on the top plate of the camera is the Mode Dial. This allows you to select all your standard exposure modes such as Program and Aperture Priority as well as some specialist modes like Macro and Movie.
We won’t go into to detail about these modes but a quick search here on Lightstalking will give you everything you need to know about all of these modes.

The Mode Dial give you access to the many exposure modes on your camera: By Ian Muttoo
Front/Rear Jog Wheel:
Depending on your camera you may either a rear wheel or a front and rear wheel. The primary purpose of these dials is to allow you to change the shutter speed or aperture. If you have a front and rear dial, shutter speed will be assigned to one, aperture to the other.
If you only have a rear or front wheel, either shutter speed or aperture will be assigned to it with the other be changes by a combination of pressing a button and moving the dial.
Hidden within your camera’s menu system, will be options to change what these dials do. For example, you might want to reassign the front dial to changing ISO.

The jog wheel, on this camera, front and right of the mode dial will control either aperture or shutter speed. By Cheon Fong Liew
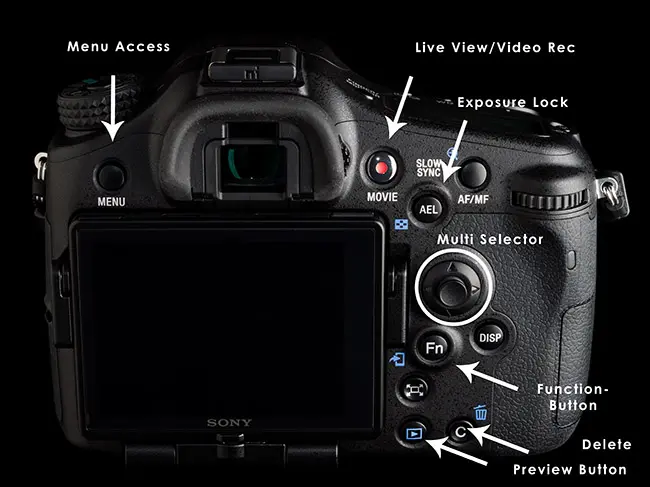
Multi Selector:
This is the big joypad style dial on the back of your camera. It will have four directional pads and a central button. Typically the central button is the set or OK button. This allows you to accept setting when using the camera’s menu. In the menu, you use the directional pads in a similar way to a mouse to navigate through the various options.
When you are not in menu mode, each of the directional pads is assigned a particular function, again, depending on camera these could include:
- Macro modes,
- ISO,
- AF Modes
- and Self Timer or Continous shooting modes.
This pads also allow you to change the position of the focus in some focus modes.
Just starting out with your DSLR for a beginner can be quite daunting. This Course “Intro To DSLR Photography“will really boost your confidence by covering all the basics and essential training you need in order to capture the photos you imagined you'd be taking from your favorites in magazines or online.
Other Important Buttons On Your Camera
AE Lock:
This button allows you to lock exposure in a similar way to a half press of the shutter. If you press and hold this button whilst composing, it will lock exposure for the scene you are pointing at. When you half press the shutter in combination, the shutter will only lock focus. This way you can lock exposure and focus from two different parts of the scene in front of you.
Menu Button:
This allows you to access the full menu hierarchy via the LCD screen on your camera’s back.
Zoom In/Out:
This buttons often have multiple functions. As well as allowing you to zoom in and out of a picture that you're reviewing after taking, they can also zoom the LCD screen when shooting in live mode (this is where you use the camera’s LCD screen rather than viewfinder). Pressing the zoom out button when reviewing images will bring you out to a screen of thumbnails where you can navigate to an image that you wish to look at.
Preview Button:
This is the button that looks like a play button on a video recorder. When pressed, it will preview the last taken image on the screen. You can use the direction pads to navigate to previous images and the zoom buttons to zoom into the image or to zoom out to thumbnails
FN Button:
This will come under the guise of different names from different companies but in essence, it is a multi-purpose button. It may be the modifier button that changes your single jog dial from aperture to shutter speed, it might access a quick settings menu of the most important functions on your camera.
Generally, you can assign different functions to this button via the cameras menu. On some camera pressing this in combination with other dials or buttons increases the functions that you can access.
Record/Live View:
This button will switch on the live preview mode, allowing you to see the scene in front of you live on the camera’s LCD screen. It often also doubles as a record button when the camera is set in movie mode from the Mode Dial.
Autofocus Mode:
Found usually on the front near the lens barrel, typically this will have three settings, S, C, and M. S is single shot mode, where the camera will focus and lock until you release the shutter. C is Continuous mode where the camera will continuously refocus even if the shutter is half pressed. M will switch the lens to manual focus.
And Finally, The Flash Button:
Pressing this will manually pop up the camera’s internal flash.
So there you have it. Different cameras will have different buttons and dials, but the ones discussed here are pretty much common to all digital cameras. They might vary in name and icon but their functions will be the same.
If you're really considering taking digital photography seriously or you just want to make sure you can learn all the essentials without the hassle, this Course “Intro To DSLR Photography” could be just your answer – condensed into one!
Further Resources
- Beginners, Try These 4 Tips to Help You Shoot Like the Pros by Jason D. Little
- A Beginner’s Guide to White Balance by Jason Row
- How to Improve Your Photography with the Remote Shutter Release by Sheen Watkins


