In a recent article here on Lightstalking, we introduced you to the considerable benefits of the open source software Gimp. Of course it’s all very well to tell you about such programs but as with any software, it can have a steep learning curve. For this reason, we are going to do a series of tutorials over the next few months that will teach you, in practical terms, how to get the best out of Gimp. In this Gimp tutorial, we are going to start with adding some sparkle to dull shots.
Import the Image
So the first thing we need to do is import our image and it is important to remember here that Gimp does not have native RAW support so we will have to open a more generic format, in this case a jpg. Opening an image is pretty much the same as for most software, from the menu select File – Open. The file manager however, because of Gimp’s open source origin and cross operating system support can look a little clunky. When you navigate to the folder containing your image, you will see the folder hierarchy appear as tabs at the top of the open dialogue.
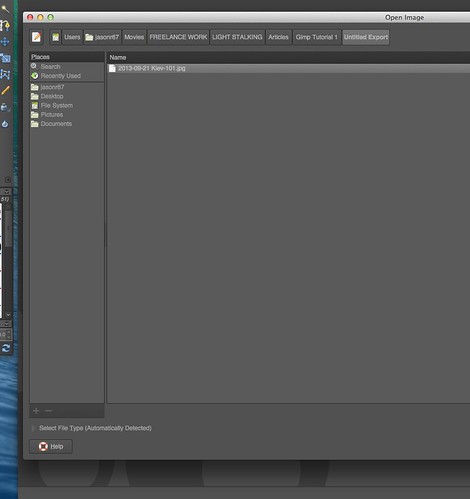
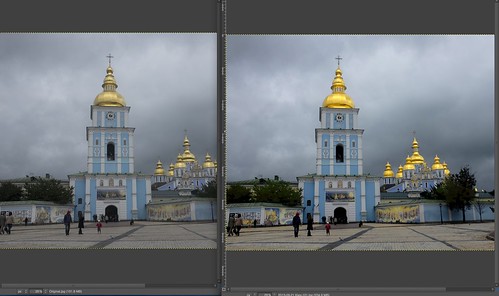
For this tutorial I am using a shot taken in Kiev in Ukraine. It was a dull, cloudy day but the image has lots of color and potential so we will use Gimp to bring out that potential using the Levels and Curves tools.
Make a Levels Adjustment
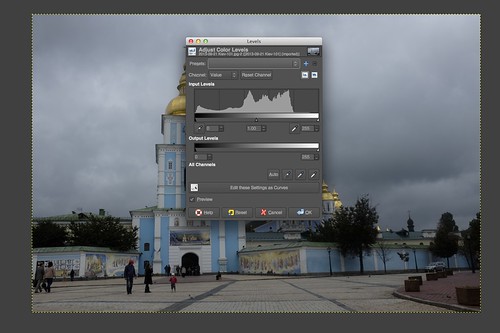
Unlike Photoshop, the image adjustment tools are located in the menu item Colors. From here select the Levels tool. The image we have picked is a little on the dark side so we are going to brighten it up a touch by sliding the mid tone slider to the left slightly. Underneath the slider, you can see that there is also a numeric indicator of your adjustment, this is a great way to make very fine level adjustments.
Next I am going to bring the highlight slider to the left a little to boost the contrast very slightly and the shadows adjustment to the right to add a little density to the blacks, taking care not to clip into the histogram to far.
Transform Levels Adjustment Into Curves
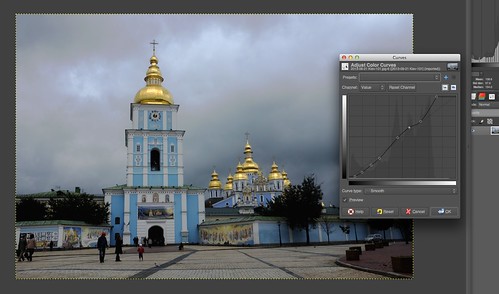
The next step is an interesting and powerful feature of Gimp. At the bottom of the Levels dialogue, we can see “Edit these Settings as Curves” – pressing this will translate the levels adjustments that we have just made over to the Curves tool. As you will see, the is a slight curve to the line based on our levels adjustment. Now we can further refine that curve to add punch to the image.
Fine Tonal Adjustment Using Curves
I will start by darkening the shadows a touch, by adjusting the curve at the left end of the histogram. You can add extra points to the curve to define exactly how you want the darker areas to look. Dragging a point down will darken the shot in that particular tonal range, dragging it up will lighten it. Next, because the sky is pretty stormy, I want to enhance that by dragging down the curve towards the lighter end (right side) of the histogram. Lastly I adjust the curves around the mid tones to get ensure the image looks punchy and dramatic. You can make as many points to the curve as you wish in order to get your image to pop. If you don’t like what you have done, pressing the reset button will return you the the curve graph that you started with, the one translated from your levels adjustments.
Boost the Colors
Next we will boost the colors a little. From the menu select Color – Hue-Saturation. Because the building is blue, I select the blue box and then increase the saturation for it. Here I have to take care because the clouds are close to blue also so as I increase the saturation, the sky might turn bluer also. Next I would like the gold domes to punch out a little. Selecting the yellow box, I increase the saturation and also the lightness to make those domes really stand out over the dark grey sky.
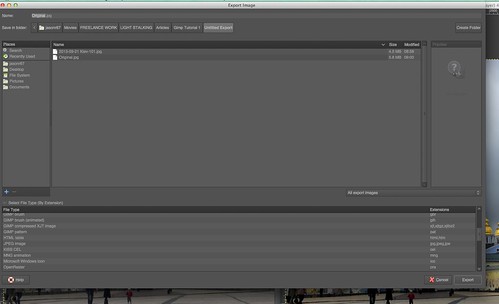
To save the image the procedure is a little different from what you might expect. ‘Save As' will not allow you to save the image as a jpg, instead you must go to File – Export As. At the bottom of this window you will see a drop down box allowing you to select your save format. Click Export to save the file.
As you can see from this initial tutorial on Gimp, it is a powerful editing program, but in some respects procedures can be a little different than those in other software you might be used to. If you have enjoyed this tutorial and would like to learn some more about Gimp, feel free to let us know in the comments section below.


2 Comments
More please!
Thanks for these tutorials.