A camera determines exposure by using metering modes. While Matrix metering is typically used and recommended for many settings, Spot and Center-weighted metering have their rightful places to enhance your images in specific situations.
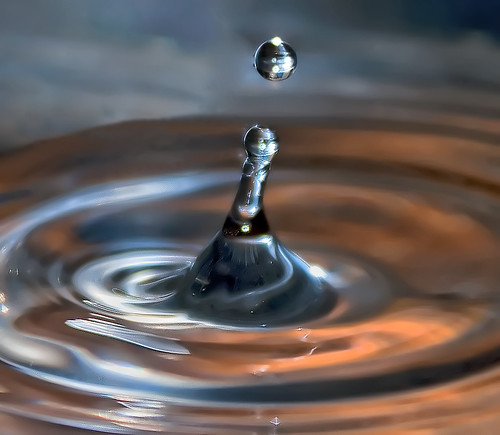
Photo by Lucy Hill
The Different Metering Modes Explained
Matrix (Nikon) or Evaluative (Canon) Metering measures the intensity of the light from multiple areas in the scene. Each camera has it's own specific ‘intelligence system' it uses to make decisions for the photographer. It reads the multiple areas in the scene and determines the best exposure for the total image. The area that is the focus point does take a higher priority in the camera's decision making cycle.
Spot Metering measures a small area of the scene. Typcially it is the center of the image, however another small area that is not in the center in the may be selected based on your camera.
Center-weighted Metering directs the reading for exposure to the central part of the view finder.
When and How to Use Each Metering Mode?
Matrix/Evaluative Metering
For most settings, matrix metering takes full advantage of the scene's lighting using it's internal algorithms to optimally expose the image. Simply compose the image and shoot. It's common for many articles and camera manuals to suggest and confirm that this mode easily works for most images. Matrix metering effectively exposes landscapes, portraits, wildlife, along with general outdoor and indoor photography.
The two images below were captured using Matrix metering in two very different light situations. The Willet on the beach at sunset was taken in Jacksonville Beach, Florida. Light was strong but provided a soft reflection on the gentle waves. Settings used: ISO 250, f/9, 1/200 sec at 450mm.

Photo by Sheen's Nature Photography
This past weekend was spent in a bright, sunshiny field of sunflowers. Matrix metering provided an exposure that balanced the bright blue sky and strong, intense yellow. Luckily, a bumble-bee made his appearance at the right time. Settings: ISO 250, f7.1 1/1250 sec, 105mm

Photo by Sheen's Nature Photography
Spot Metering
The most common use of spot metering is with images that have a lot of contrast. Spot metering zones in on a small area, takes the reading and composes the exposure. Since it is working with a small point on the image, the camera focus option should be on ‘single point'.
Spot metering is easy in that metering and focusing occur at the same time.
Spot metering is the best choice when shooting into a bright area or light and the background is dark. Spot provides more control in exposure and will help prevent under and over exposed images. Subjects such as the moon against a dark sky, a models fair face against dark hair, a bright flower in a dark wooded forest will have a more accurate exposure and better detail using spot metering.
Use of spot metering is not limited to only high contrast situations. The first image in this article by Lucy Hill shows a beautiful backlit illumination in the water droplet. She effectively captured this light using spot metering.
To demonstrate how matrix and spot metering are different, we'll compare two moon images. Both images below used single point focus selection. The first was taken using Spot metering a few weeks ago. The detail and texture of the moon are readily visible. Settings: ISO 100, f/11, 1/80sec, 400mm

Photo by Sheen's Nature Photography
The second moon image was taken using Matrix metering. While there's still some detail and shades of the moon's colors, the details and texture are not readily seen. Note: this moon image was taken in June 2013. Settings used: ISO 100, f/6.5, 1/125 sec, 450mm.

Photo by Sheen Watkins
Center-Weighted Metering
This mode may be the least used as it can require two steps. The meter concentrates on the central area of the viewfinder. Encompass the bright area of the image by placing it in the center of the viewfinder. Then, use exposure lock to keep that exposure. From there, recompose to capture the image. A bright sky with a darker ground can frequently cause an exposure challenge. By reading the exposure from the light sky and then recomposing to include the ground, a more properly exposed image in a dramatic contrast situation will be created.
Photo by Digitalpimp
Once you start using the different modes on a consistent basis, it's always good to go through your mental pre-shoot checklist. For a quick refresher, check out: 5 Quick Camera Checks Before You Release the Shutter so you start your next session with the correct settings.


