All lenses distort. Most have some degree of barrel distortion as well as pin cushioning. They often also have other issues such as chromatic aberration and vignetting. Modern day lenses keep these issues well controlled but can never eliminate them entirely. For this reason we have lens correction software. Until recently this software often took the form of standalone apps or plugin for Photoshop. Nowadays, however, most higher end software will have lens correction built in. Today we are going to take a look at one of the most powerful of the built-in tools, Lightroom’s Lens Corrections.
Find it in the Develop Module
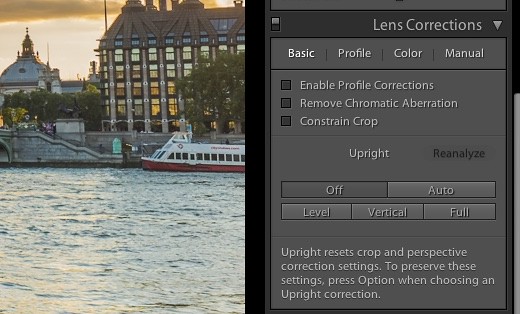
For such a powerful tool, Lens Corrections is fairly hidden at the bottom of the Lightroom Develop module. It may even be concealed. If you do not see it on your version of Lightroom, right click anywhere in the Develop Module window and select it. The tools are split into four separate tabs, Basic, Profile, Color, and Manual. These are described in detail below.
1. Basic
Basic gives us access to a range of automatic corrections based on profiles for our camera and lens combination (set in the Profile tab). At the top we have Enable Profile Corrections, enabling this will automatically detect barrel and pincushion distortion and vignetting and attempt to automatically correct it whilst Remove Chromatic Aberration is self explanatory. Because when you remove distortions, the software has to expand and crop into the image, ticking the Constrain Crop box will automatically crop the image back, eliminating any excess canvas areas.
Below this, we have a series of tools to automatically correct geometric distortions such as converging parallel and slanted horizons. The Auto tool will analyse the image and attempt to correct all distortions and level the image. This can be a bit hit and miss, especially in complicated scenes but works well when you have images that contain a lot of straight lines, for example architectural shots.
The three buttons at the bottom allow you to correct the horizon, (Level) vertical distortion, such as converging verticals while the Full button does both vertical and horizontal correction.
The Lens Correction tool is found near the bottom of the Develop Module
2. Profile
Enabling the profile tab allows us to select the camera and lens combination that is used in the Basic tab. Choosing Auto from the Setup drop down will select the camera lens based on the EXIF data but you can also manually select this information. You may find that some newer cameras, particularly mirrorless systems are not represented here. This is because they apply their own in camera correction to images when shooting. If you are using a camera that does this, you should not check the Enable Profile Corrections in the Basic tab.
At the bottom, you can choose how much to correct distortion and vignetting using slider controls

A profile using Nikon camera and lens
3. Color
The third of our tabs allows us to remove Chromatic Aberrations. Checking the box at the top will attempt to automatically correct this whilst at the bottom, the individual sliders allow much finer control. When correcting chromatic aberration, you need to zoom into the image beyond 100% to identify the type of color fringing. Just below the Remove Chromatic Aberration check box, the eye dropper tool allows you to select an area of color fringing. Lightroom will then attempt to correct based on your selection. Removing chromatic aberration, particularly in high contrast scenes can add noticeable sharpness to your images.

Manually correcting chromatic aberration
4. Manual
The last of our tabs is Manual. This, as the name suggests, gives us full control over all the lens correction tools. The distortion slider deals with the pincushion/barrel distortion. The next two sliders control vertical and horizontal perspective. Rotate allows you to level the horizon, although you might find the Horizon level tool in the Crop section easier to use.
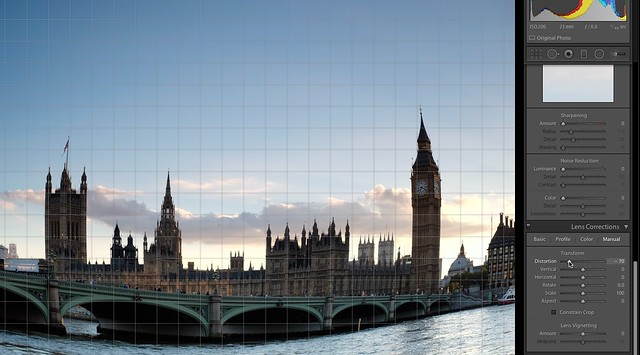
Correcting Distortion
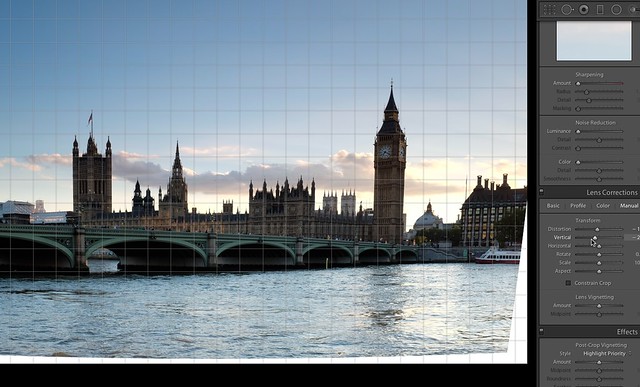
Correcting vertical perspective
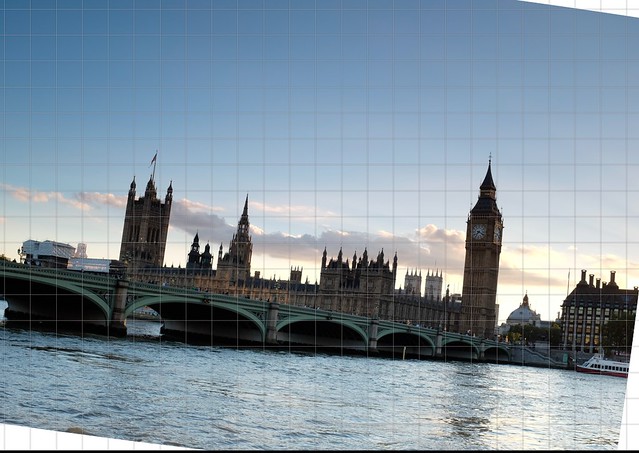
Rotating an image
Other Tools
Scale allows us to zoom into the image to remove canvas areas that have appeared due to our corrections, whilst aspect will change the ratio between the length and width of the image. This is quite useful when making big corrections to vertical or horizontal perspective.
The Constrain Crop box, as in the Basic tab, will crop out excess canvas areas. At the very bottom we can manually remove or add vignetting to our shots.
In Conclusion
Lightroom’s lens correction tools are a very powerful and underused way of getting maximum quality from your images. Distortion is often not immediately apparent until you start to use the tool, then you notice how much better the image looks when corrected, especially for scenes with lots of straight lines. Removing chromatic aberration can add a surprising level of extra sharpness to an image. As with all Lightroom corrections, using this tool is non destructive, so you can experiment at will to see how each particular slider works.


