We are blessed that we were born with the ability to see in color. Seeing the deep blue of a summer’s sky or the intense red of a spring rose is something that we perhaps take for granted. As we see in color so our cameras take pictures in color but sometimes all the colors of the rainbow are too many, sometimes just two colors and all shades between can evoke emotions so far beyond the spectrum of our color spectrum. The name of those two colors: Black and White. Of course, pedants might say that neither black nor white are colors, they are merely the pure light and the absolute absence of light, but I would imagine they would have a hard time explaining that to Ansel Adams. Today we are going to look at five keys to improving your black and white landscapes.
1. Light and Shade
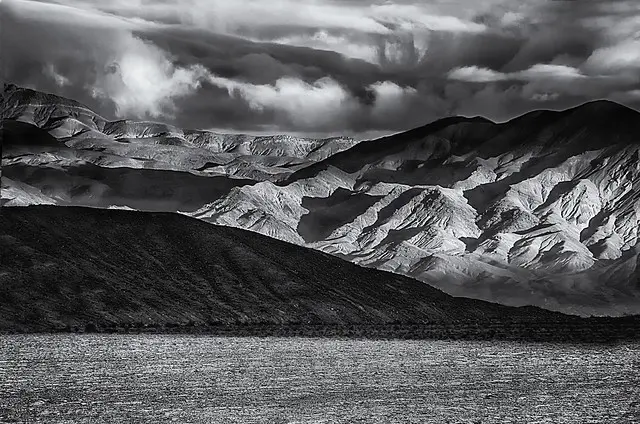
The first key to black and white landscapes is being able to see in light and shade. This can be a difficult thing to do at first, but with a little thought and practice, you will find yourself looking at a scene in a different way. You will look at the sky and determine whether it has interest or definition, you will look at the mid tones of the scene in front of you looking for textures and you will look into the deep shadows looking for details. Any scene can be converted to black and white but only some will look good.
2. Contrast
Light and shade are the first things that you need to look for but the next thing is the difference between the light and the shade. Digital sensors are amazing devices but they are still nowhere near as good as our eyes for picking out tonal range. A good black and white shot needs to have contrast, this can be low contrast or high contrast but with the absence of color, it is the contrast that is helping to create our composition.
In high contrast scenes our sensors may struggle, the blacks too black and the whites too white so we must understand the limits of our cameras and expose accordingly. If the scene in front of you has too much contrast then it is time to consider using a graduated filter, to reduce exposure in the sky areas or moving to an HDR shot, shooting several exposures to widen the potential tonal range.

3. The Zone System
Developed by Ansel Adams we know know it more commonly as matrix metering. Our camera’s meter breaks the scene into various zones and averages out the exposure. Except of course average is not alway what we are looking for. To truly zone meter, use your camera’s spot meter or a handheld meter and measure the lightest darkest points in the scene and also several mid-tones in between. Then fixing either your shutter speed or aperture, you need to calculate where the optimum exposure lies, bearing in mind the tonal range of your sensor.
4. Composition
Good composition is important in all photographs, but in black and white it can make the difference between mundane and great. The normal rules work of course – the rule of thirds, leading lines etc but you are also looking to compose using the tones in the image, perhaps placing a darker object one one third or using shadows or textures as leading lines to the main subject. Using the tones in your composition is a great way to start thinking in black and white, it forces you to look for the light, shade and contrast much more than a conventional color photograph ever would.

5. Filters
In the days of film, a black and white photographer’s kit bag would be full of multi-colored filters to enhance and darken skies, hold back foliage even to shoot infrared. These days, whilst grads, ND’s and polarizers are still essential, there is no need for the color filters. The reason? Post production.
Software like Photoshop and Lightroom allow us to peek deep inside the data of our digital images, isolating the red, green and blue channels using the channel mixer. When we convert to black and white, these channels are maintained, allowing us to have accurate control over exactly how we want the image to look. All the effects we once did using color filter can now be achieved simply using a the channel mixer.
Black and white landscape photography can lead to powerful emotive images. Whilst it is possible to trawl through our catalogues looking for images to convert, the best images will come from shots that have been conceived with black and white in mind. Applying this few tips plus others will help you visualize and shoot better black and white landscapes.


14 Comments
All very reasonable, but two things:
1) LiveView to the rescue. I can heartily recommend living with the preview being black&white – if it makes you think about the structure of a shot rather than its colours, then even if the result is colour it’ll have structure in its favour as well.
2) The blue channel typically has the worst signal:noise ratio; if the camera doesn’t have that great a dynamic range, *do* use a blue filter at source (and shoot in a fixed white-balance) to maintain the greatest tonal detail in it.
Thank you Tim. Those are both excellent recommendations. Astrophotography is where I have used the WYSIWYG advantages of live viewing and specific spectrum filters. I have added manual focus to sharpen the image with digital zoom. Take care
“In the days of film”? We are still in the days of film. BW film is still said to be unmatched by digital in terms of tonality. Maybe “in the days of film only” is a better statement.
Some people still shoot daguerrotype. But in reality, the day has well and truly passed, just as it has for film.
Actually… that comparison is rather unfair 🙂 Daguerrotype is shoot today only by the die-hard fans of mercury vapour or professionals looking for that niche market.
Film, on the other hand, is shot by millions and is relatively cheep (actually, it doesn’t cost more than what it used to when you count inflation) and obtainable even in medium and large formats.
It is still the superior medium to digital… in every way ( I have recently met two wedding photographers who decided to shoot film side by side with digital in order to get those extra special shots).
Of course film is no longer produced for the consumer market, but then again most consumers do not shoot for hobby or for living? digital is convenient but it will never replace film :)… and that is my humble opinion 🙂
Its nice to say, but it simply isn’t true. Its a fallacy to say that because usage is small, its time is past.
The fact of the matter is, film is still state of the art for B&W. Of course this won’t always be true, but for the time being, there is no commercially available that will cover the tonal range and resolution of an affordable film camera. While digital may hold its own against 35mm, medium formats near 100 MP resolution and large formats 320 MP cameras packaged with developing equiptment and a decent scanner can’t be touched. Especially at todays prices.
But technology moves on. That won’t always be the case, but for the time being for those who care about the minute quality…. there it is.
Who are you kidding?
Cost of LF kit: £500
Cost of Epson V700: £400
Cost of Nova film processor: £250
Cost of Tetenal E6 kit: £65 for every 240 sheets (if very lucky)
Gets you: 6000-7000px on the long side, after lens aperture diffraction and scanner diffusion; dynamic range of 5EV (E6), 11EV (C41), maybe 14EV at a pull (HP5)
Cost of NEX-7 plus two kit lenses: £850
Cost of SD card: £10, stores 120 shots many many times over.
Gets you: 6000px directly on the long side, rising to 7500px with super-resolution; dynamic range of 13EV if you believe DxO, with HDR bracketing +/-2EV as standard.
Maybe you like being glued to a tripod. Maybe you like having to faff around with Scheimpflug to get an acceptable focus/shutter-speed tradeoff. Maybe you like the abject laziness of settling for Fujilabs’ engineers’ ideas of what good colour-response and grain should be. Maybe you like the stench of fixer. Maybe you have drainage that can cope with that amount of chemistry. Maybe you like frittering away hours dust-spotting only to have one image to show for it.
But at the end of the day, for *less* money, for *less* time wasted, and with greater comfort, I could have hit the shutter button as many times I want at 10fps at a rate of 24MPel data per image, and blended it into one perfect frame and got it published online in under an hour flat, for LESS MONEY, and nobody viewing is going to give a damn what process was used, just say “nice photo” and move on.
Well this is so well summarized Tim. For me just like millions of other pro photographers, there’s no use living in the past. That’s why I rejoiced and appreciated the dawning of digital. One has so much control of your own images in a short space of time. No hit and miss affair like with film. Remember the old, but embrace the new, no doubt for me.
Tim,
Great works of art are rarely gained by taking the easy route.
Nobody’s trying to kid anyone. This is just one of those things that digital and film photographers disagree on.
I’ve notice that digital fanatics tend to focus and cost of shot and workflow while the film evangelists tend to focus on craft and quality. There of course is no right answer, just different paths in the art.
However, I do believe your math is a bit wrong. 6000-7000 pixels on the long side of a large format negative is a bit on the low side. With 5″ from a 4×5 and a nominal 2000 dpi, you are looking at 10,000 pixels. But if we’re going for quality, one of the better desktop scanners will yield you 4000 dpi and 20,000 pixels on the long side. And we’re not even talking about the quality CRAZY people (you know, those 8×10 people, you know who you are) with 40,000 on the long side. Most people I talk with seem to agree that the true resolution of a good fine grain modern B&W film is scanned between 6000 and 8000 dpi on a drum scanner. But at that point, unless you’re trying to print at crazy sizes, there’s no real point.
I am however, one of those people who believes that comparing a scanned image of film to a direct digital image is just silly. Film “pixels” are roughly round, and digital pixels are square. You know that saying about putting a round peg into a square hole? So the best quality from film to print is going to be the old wet processes.
And we won’t even get into that discussion of perceived tonality.
Now keep in mind, I am not disagreeing with you about work flow. You can get many more images taken and processed using digital. AND, most people won’t care about the difference between a digital inkjet printed image vs. a film to silver paper print.
BUT,
There ARE a lot of people who LIKE dragging a tripod around (most pros say you should do this anyway.)
Some people like the composing and adjusting and taking that ONE shot.
Some people like sniffing chemicals.
And some people LIVE for those few people who stop, look at your photo, and get drawn in.
Ultra High resolution photos allow you to shoot that extra dimension, that really small tree, or a person as a secondary or tertiary subject that would normally just be white noise in a regular photo.
But thats just my opinion.
PS. I like digital, I just prefer film for my landscapes.
I think all this discussion is fine but what everyone seems to have missed is that all of these images people are talking about are RGB images NOT Mono/ Greyscale. So when you talk about Black and White you should say it is RGB Black and White.
Ansell Adams never shot his fabulous images in RGB they were in TRUE Black and white.
Lets see some REAL Black and White/ Greyscale [email protected]
I shoot both film (and slides) and digital. I feel those who shoot digital and rely on “fixing in photoshop” are being lazy and missing the point of shooting. It irks me when I hear people say “don’t worry about that, you can fix it in photoshop”. What ever happened to getting it right when you take the photo?
I totally agree with u. In digital it’s easy to correct most of your mistakes in Photoshop. But u have to learn another complicated unnecessary skill.john
I’m am so sick of this argument. I shoot both and both have their qualities. Shoot what you want and get over it. By the way while we are at it Android is better than iPhone, Chevy is better than ford, Mercedes is better than BMW, and the Denver Broncos are better than everyone this year….I hope.