Today’s article is aimed at the newcomers amongst you, both to Lightstalking and to photography itself. Today we are going to take a look at getting to know your DSLR, understanding what some of those knobs, buttons and dials do, and which ones you need to master first to get to grips with your new tool. I am sure there will be many of you that have joined the ranks of DSLR owners from compact cameras or even camera phones and find that a DSLR looks great but is somewhat daunting to understand. Obviously with so many different DSLR’s on the market, all with slightly different controls, this article has to take a generic look at the features but for the most part, these are the most important things to learn.
The Big Dial – Exposure Modes
Every DSLR has one, on the top, looking like a cypher from the Da Vinci Code. The most important letters are P, A, S, and M. These are the traditional camera exposure modes. P is the program mode and in this, the camera will do everything for you; A is Aperture Priority, in this mode you decide the aperture that you want and the camera will set the shutter speed; S is Shutter Priority, here you decide the shutter speed and the camera will set the aperture; M is Manual, where you set both aperture and shutter speed. Most likely you will use the P mode when you first start out, but take time to learn the A and S modes next, as this will give you a good understanding of how exposure works. Experiment with different apertures and shutters speeds and see the different effects they have on your shots, for example a slow shutter speed may give you a shaky image, whilst a wide aperture (lower number) will give you a shallow depth of field, in other words the background will be out of focus.
When you are comfortable with A and S, it’s time to go to M. Here you will learn to read the exposure meter, that appears in your viewfinder. The basic idea is to change your shutter speed or aperture until the indicator is in the middle, which means a correct exposure. With your understanding of aperture and shutter speed gleaned from the A and S modes you are now free to be in complete control of your exposure.
On most cameras, the big dial will also give you a range of modes suited to different scenes, for example landscapes and portraits. Whilst this are fine if you are just starting out, learning the A, S and M modes will give you greater control over your images compared to the scene modes.
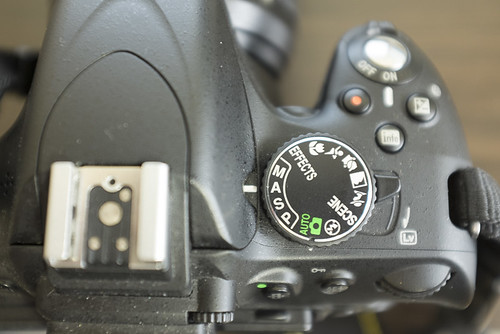
The big dial by Jason Row Photography, on Flickr
ISO or Film Speed
This control may be in the form of a button or may be buried in the menu system somewhere. Put simply, it controls the sensitivity of the sensor to light. Lower numbers are better quality but if there is not enough light, you may get camera shake, higher numbers will reduce this but also reduce image quality. The basics of DLSR and indeed all photography is the balance between Aperture, Shutter Speed and ISO.

Menu based ISO settings by Jason Row Photography, on Flickr
Metering Modes
Most cameras will have two or three metering modes. The default is usually matrix or evaluative mode – this is a very clever mode that measures the light levels from all over the scene and averages them out to give a correct exposure. For many shots this mode is great but if your subject is very much in the center and has different light to the background, for example a brown dog in a field of snow, then switch to the center weighted mode. This reads the whole image but gives more “weight” to the central area of the scene. The third mode, found on some cameras is spot metering, this is a further development of center weighted giving a reading from only a small percentage of the center of the scene.
Autofocus Modes
Most common autofocus modes are S, C and M. S is single shot mode. This means the camera will attempt to focus on the subject and then lock on to it. Ideal for non moving subjects. C is continuous mode, here the camera will attempt to track a moving subject and will not fire until locked onto it. M is of course manual focus and an art that is well worth learning once you understand the other autofocus modes.
There is another element to autofocus, which is the autofocus area. Like exposure modes, your autofocus system can select from a matrix mode where it decides from a range of points where the correct focus is or single point, which is a little like spot metering, where the focus is a single point with in the frame, you can decide where you want that point to be. When learning about auto and indeed manual focus, it is best to use the single point focus mode, this will teach you you to reposition your camera after focusing on your subject and aid you to think about composition.
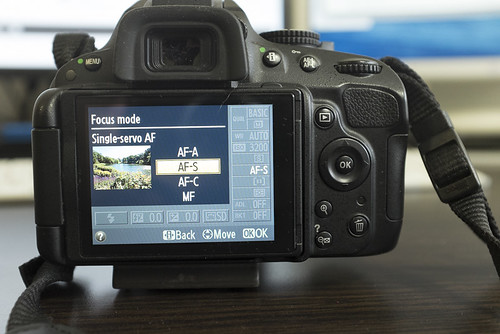
Single Shot autofocus mode by Jason Row Photography, on Flickr
That's it for part one of this series, and I think plenty for you to get started on. Whilst getting used to a DSLR might seem daunting at first, there is no harm in playing with the various controls and trying to understand the relationship between them all. If you get lost, confused or frustrated, the forums here at Lightstalking are a friendly place to seek advice from your fellow DSLR users.
In the second part of this series, we will look at some slightly more advanced features, such as exposure compensation, which is useful to know in combination with exposure modes, exposure bracketing, color balance and image file and quality settings.


