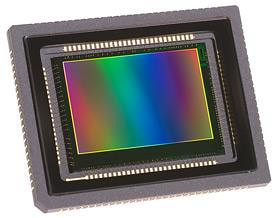
The three spots you see in the photograph below are sensor dust. Small pieces of dust, fiber or hair that are sitting on the sensor of your digital camera. The most common reason dust shows up on your sensor is from changing your lens. It's nearly impossible to stop dust from getting in, so at one point or another you're bound to see these little demons.

Photo by Luis Quintero
Cleaning your sensor has always been something most people are afraid of as they don't want to ruin the sensor. Being afraid isn't a bad thing, you can do some serious damage if you aren't careful.
There are a few different techniques to cleaning your sensor, each has a fan base over the other. The most popular methods are:
- Air blower
- Dry swabs
- Wet swabs
- Dust picker
When you are ready to clean your sensor, choose the method you feel most comfortable with, I personally prefer wet swabs. Clean an area of a table that you can sit at and ensure no nearby windows are open. Also make sure you are not on carpet so you don't accidentally discharge static electricity. Before you remove the lens, clean the body and lens of your camera of all dust and debris as to not allow any to fall in while working on it. Set your camera in sensor cleaning mode – if you are unsure how, refer to your owners manual. Remove the lens and lay the camera on its back.
Looking inside you will see the sensor. What you may not see is the dust on the sensor, this is normal. Even the smallest amount of dust partials can create sensor spots, don't be alarmed if you can't visually see them! As mentioned, I prefer the pre-wet swabs, it means you don't need to drop oil onto a swab and risk over or under moistening it.
Each method has very specific instructions on how to use them, so I strongly suggest reading them prior to starting. With that said, I generally don't like the air / dust blower method. My reasoning is that the device, which looks like a turkey baster, often blows new dust into the camera. The rubber bulb end often has particles inside from when the rubber was molded and can blow onto your sensor.
Likewise, the dust pickers, which look like a pen with a very small rubber disc on the end just plain scare me. The idea is that you visually see the dust on the sensor and then apply a small amount of pressure to the device and when you remove it, the dust will stick to the rubber disc. The problem with this method is that it's far too easy to apply too much pressure and cause damage.
Most all swabs suggest one or two soft swipes from left to right on the sensor. That is all that is needed. When you are done, take your camera out of sensor clean mode and mount the lens. To test the camera, go outside on a sunny day and set the camera to f/22 in aperture priority mode and take a photo of the sky. Load the photo onto your computer and view at 100%, looking for sensor dust. If you still see dust, simply repeat the steps to clean.
Cleaning your sensor is somewhat risky! You can cause severe damage to your camera's sensor if you are not careful or don't have steady hands. If you are at all uncomfortable attempting to clean your sensor, see a local camera store. Most offer a while you wait sensor cleaning service for a nominal fee.

