The eight to five workday starts. Workers swipe time clocks, dash through closing elevator doors and fight rush hour traffic. By this time in a completely different setting, many nature photographers have already had their coffee while watching a kaleidoscope of life emerge.
Mornings filled with fog, a light mist highlighted by the sun's rays or hovering like a blanket over low lands are a delight to photograph. To effectively capture the mood and color, there are three essentials. These include 1) Timing 2) Tools and 3) Technique.
Settings: 50mm 1.8G, ISO 1000, f/5, 1/2000 seconds. Photo by Sheen's Nature Photography
The Best Time to Create Misty Shots
Just like the sunrise, morning mist lasts for a brief period of time. Once the sun is above the tree line, the misty moment quickly evaporates. Familiarity with an area, the lighting and the weather pattern is helpful in planning your morning schedule so that you arrive in time to capture a medley of lighting. Going to the area that the light hits first and then moving to the next destination will maximize your time and opportunities.
If you are an early riser and have a game plan for photographing something specific, it's a good personal practice to be flexible. Beautiful, misty moments pop up in unexpected places. Switching lenses if needed and taking advantage of the fleeting moment will never be wasted time.
The image below, “This Magic Moment” was unplanned. Another photographer partner and I were heading out to photograph ducks and herons. When we stepped out of the car, across the road was a field glowing with the sun filtering through the trees. A quick camera and lens change to my 50mm 1.8 G was all that was needed.

Settings: ISO 400, f/7.1, 1/160 seconds. Photo by Sheen's Nature Photography
What Tools to Use
1. Prime & Mid-range Telephoto Lenses for Landscape Mist & Fog
For those that may have read my review of the Nikon 50mm 1.8G Prime lens may recall that my nifty fifty lens is always in my bag ready to emerge if not already on my camera. A 24mm, 28mm, 35mm, 50mm or 85mm prime lens fits the bill more times than not when coming upon misty landscape moments. A short to mid-range telephoto zoom also works very well.

Photo by Susanne Nilsson
2. Longer Range Lenses for Wildlife in the Mist
Birds and wildlife amidst the mist unless very close, need a longer range telephoto. The zooming in should be close enough to recognize the subject, but including enough of the surrounding area to convey the atmosphere and mood.

Settings: Sigma at 450mm, ISO 250, f/6.3, 1/250 seconds. Photo by Sheen's Nature Photography
3. Circular Polarizing Filter
When photographing mist, particularly when backlit, the sunlight can diffuse the effect. A circular polarizing filter, sometimes called “sunglasses for your lens” reduces glare and lets the natural light, rays and glow shine through.
Technique
When photographing in the fog and mist, it's not unusual for images to come out a bit flat or lacking in the details that you saw in the moment. The following techniques will help bring the moment to life long after the fog fades.
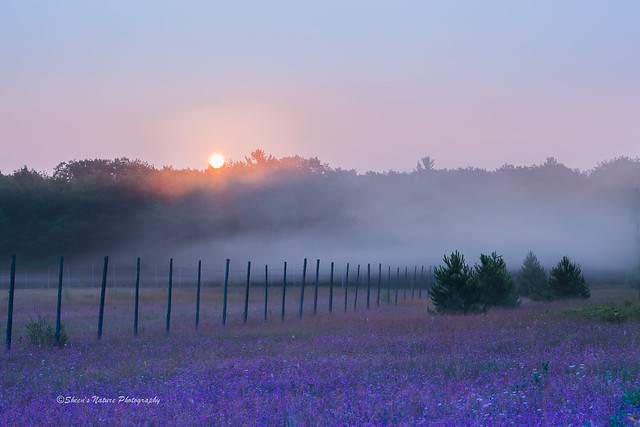
Subject & Depth – Having subject elements closer to the camera will create more contrast against the atmosphere. Including a subject that is in defined focus adds diversity and overall interest. It could be the bright color of the flowers that get softer as they are enfolded by the haze, shadow lines of the trees getting less stark, hard shapes of stationary subjects such as a fence or a silhouette of an animal.

Settings used with 50mm: ISO 250, f/8, 1/1000 seconds. Photo by Sheen's Nature Photography
When photographing a silhouette, expose the lighting to the fog versus the subject will help optimize the contrast.
Lighting – Light rays are the most visible when you are standing close but not directly in the light source. The most defined mist comes from backlighting or side lighting. Check out the footing first, then take a few steps forward, backwards, right and left while looking through the viewfinder (not the playback screen). Looking through the viewfinder provides a good indicator of how much of the rays are being picked up by the camera.
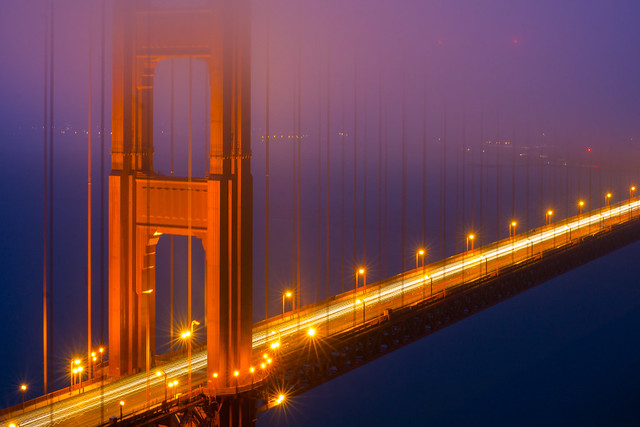
Photo by Nan Palmero
Shutter Speed – If looking to separate the texture of mist or fog from the air, a faster shutter speed is required. Slower shutter speeds can be impactful when looking to show a steady haze in which the line between the air and the fog is much softer. The Golden Gate image above used a long shutter speed resulting in a warm glow against the midnight blue water and sky.
Even if your images don't turn out as expected on a given shoot, moments watching your small piece of the world wake up creates pleasant, visual memories that last.


8 Comments
Very informative , it is a great learning. I want to share one or two photos and want your feedback. How can I do that.
Hi Arindam – you can post a link or share it on our forum. Look forward to seeing it!!
it sounds exciting and can,t wait to go out and try! I will let you know my results!
Thanks!
Hello Maria – please share and include your settings too. Look forward to seeing it!
I always gain a better knowledge each time I read your posts. I have done a few misty shots, did no know what exposure to use, now I do thanks go much. Will go and have another try.
Hi Pamela – thank you for your feedback! Good luck and share your work – we’d love to see it!
great tips enjoyed reading and hoping to find suitable place to practice it.
jaikumar
Hi there Jaishruti – awesome and have fun shooting!