We had a tutorial on how to soften harsh shadows in Photoshop on a monochrome image, which is basically the easier job. Monochrome leaves you with choice of just gray tones to play with while in a color image you are toying with the whole RGB spectrum.
Here we are going to repair some of the color too due to poor lighting conditions. Usually you wouldn't need to worry too much about this, but you should know how to tackle it, just in case.
Sometimes the picture can be great, but harsh light or bad color temperature can mess up the image. If you know how to repair that you can save the image, otherwise it can be total waste.
Of course, it's best if you get everything right in camera first time: light, color, pose, everything – however, it's not always going to swing your way! So, plan your shoots accordingly if you can in order to avoid heavy repairs in post production, since you never know how they will turn out.
Note: If you are interesting in taking your post production on portraiture even further than this article, you should consider Photography Concentrate's course on the topic. It's a generalist course, but it concentrates primarily on examples of people photography so is quite useful for portrait shooters.
Frequency Separation
You're probably hearing about this term/method more often due to its increasing popularity. This is because it gives you the most flexibility when editing however, it can get a tad complicated but once you get the hang of it, it's really helpful.
For a deeper understanding of frequency separation and how it works, you can click on the link and read further…
Preparation
- Duplicate the layer twice, you can do so by using the shortcut CTRL+J (twice of course).
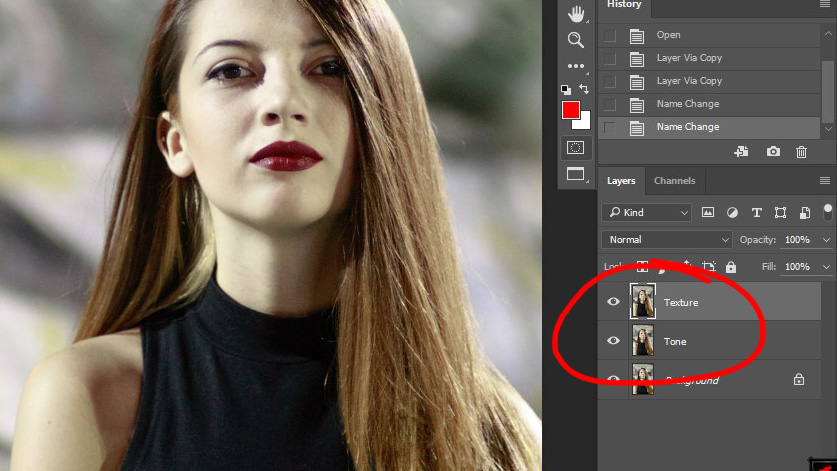
- Rename the first copy as Tone, second copy as Texture. You can do so by double-clicking the text on the layer.
- Use 6-10px Gaussian Blur on the Tone layer.

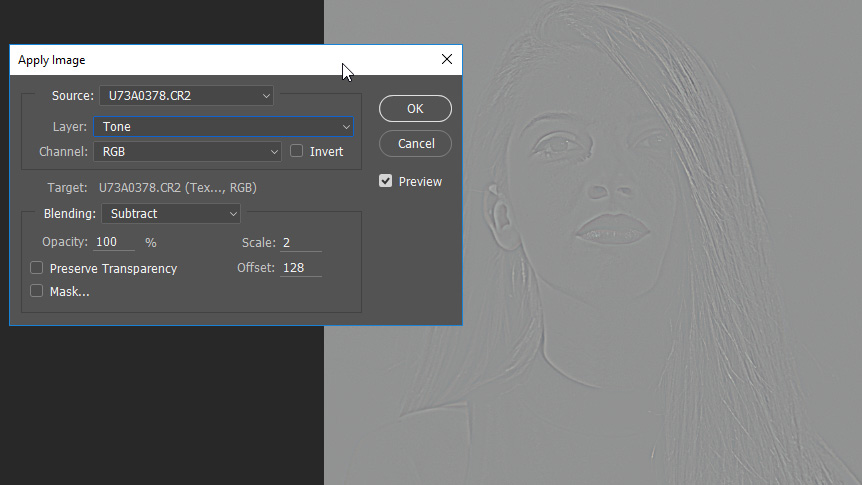
- Select the Texture layer. Head to the Image menu, choose Apply Image. Inside the box from the “Layer” dropdown menu choose Tone, set Blending Mode as Subtract. Opacity 100%, Scale -> 2, Offset -> 128. Hit OK.
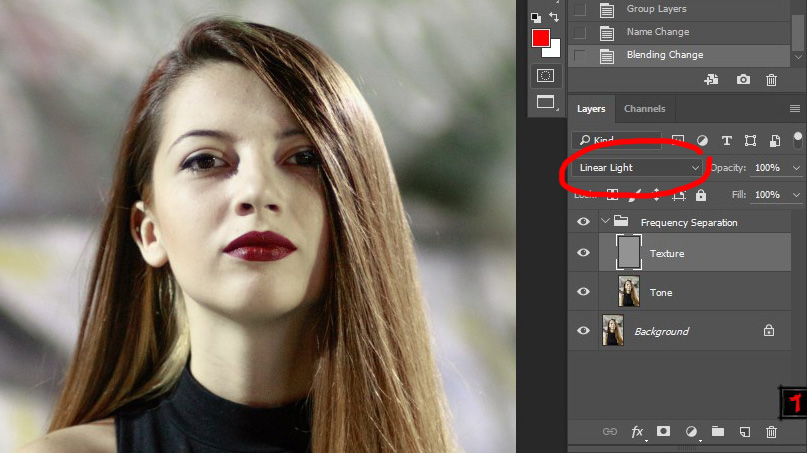
- While you have the Texture layer selected, change its Blending Mode to Linear Light.
- Select both Tone and Texture layers and group them together, you can do so by pressing CTRL+G.
- Check if everything is done properly by turning the group of both layers on and off. If there is no visual change, you are all set.


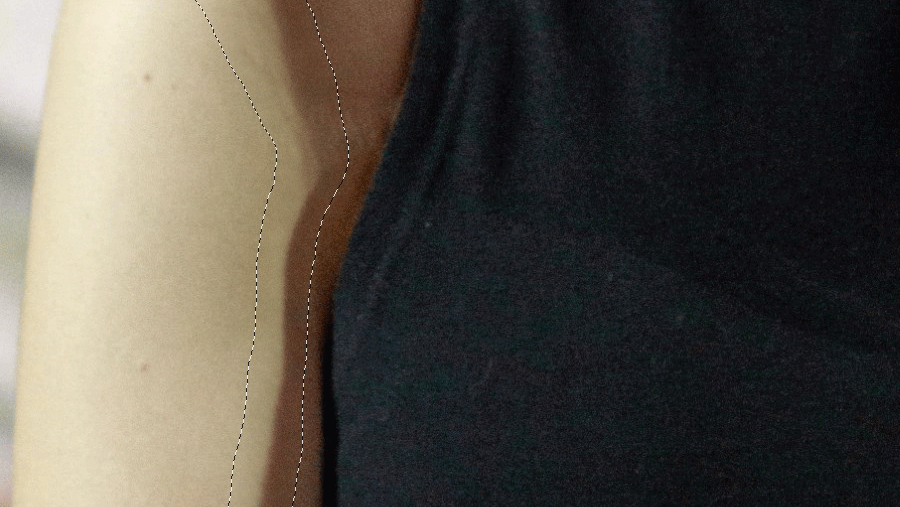
Softening The Shadows
First of all, we need to identify where the harsh shadows are. Additionally, it may seem obvious to begin with but don't forget that some might be easier to soften up than others. Bear in mind also that most of this process is done by eye – there is no equation that will do it for you.
Therefore, when you are softening different shadows, you’ll have to decide how much you’ll do it, and then replicate that amount to every shadow. During the process of shadow softening we'll do the rest of the portrait touch up as too, since frequency separation is used for both.
Now, since we are working with harsh shadows, they have an edge, therefore the first thing we need to do is to remove it in the Texture layer.
Using the Patch Tool, a selection around the shadow's edge needs to be made. Once that is done, drag towards a skin area which is smooth to replace the edge with smooth skin texture. If we are to use the clone stamp or healing brush, the texture will be damaged and the correction will be quite obvious.
Once the texture edges are out of the way, it's then time to start the more “painstaking” process. Sampling color and painting. It is recommended to use a pen tablet for this, especially if you can get your hands on one that supports pressure sensitivity as well.
For this process, create a new layer between the Tone and Texture layer. This new layer will be later merged with the Tone layer (or you can keep the file unmerged for nondestructive workflow) but for the sake of corrections, we will work in a separate layer.
To sample a color (have a source color to use) hold down the Alt key, and click on an area from which you’d like to sample the color. The idea is to create a smoother gradient by hand, therefore sample the lighter side of the skin, and paint over the edge, and do the same with the dark side until the edge becomes smooth. For this process you’ll need a brush with 0% Hardness, Opacity set to 100% and Flow to 2-4%. If you want even more control, lower the opacity.

After all of the shadows are smoothened towards your liking, it is time to do the rest of the touchup.
Finishing Touches
The process of retouching a portrait is similar to the shadow softening, you just need to apply it to the rest of the portrait. Among other things, we need to restore and repair the color on the picture, so we will tackle that now.
Simple Saturation boost won’t do, since there is lack of information due to bad light. Therefore, boosting the saturation repairs the color in the hair and lips, but the skin is still a mess. This is why we boost the saturation with an adjustment layer: using the mask, we will avoid the skin. Since the color on the shirt is bad as well, we will avoid that too.

We create another Saturation Adjustment layer, using inverted layer mask from the last one. So we select the previous layer mask; using the Alt key and dragging the mask over the new Saturation layer mask will create the same mask for it too.
Then you just press CTRL+I to invert it, and you are all set. In this new Saturation layer, we modify the saturation and hue on the yellow tones just slightly so they match the more natural skin color.

On top of all that add a Curves Adjustment layer to tighten up the shadows, and a Vibrance adjustment layer to even out the contrasts between the colors themselves since Vibrance works differently to Saturation.

And there it is! One nice portrait under challenging or mixed light.
All you need is some elbow grease, a little time and most pictures can be recovered to produce a fantastic result.
If you fancy really delving deep into learning some great Lightroom Editing skills too, this amazing guide from Photography Concentrate could be the answer. Worth checking out if you want to hone your post processing even further than this article takes you.


3 Comments
Much faster and easier to put diffuser and shoot with it 🙂
Yeah, but if we wrote about that, some other person would come along and tell us that, rather than buying ANOTHER piece of gear, we should have told them how to do it in post. Can’t win.
Just wanted to point out that for frequency separation on a 16-bit image, on the texture layer, you’d use a blending mode of “Add,” and Scale 2, Offset 0.