Reciprocity is a law in photography that refers to the relationship between the aperture and shutter speed values. The aperture value and shutter speed are inversely proportional which means, if one value increases, the other decreases.
This inverse relationship is what gives the reciprocity law its name. Understanding reciprocity can help a photographer master manual mode and create the photographs that they visualise.
Today we are going to look in-depth at the Photography Law of Reciprocity
There are many laws or rules or guidelines in photography that photographers follow in order to get the technicalities and composition right. These depend on the situations, scene or kind of story that one is photographing which means the laws or guidelines are tweaked/changed depending on the situation in the field.
Among many of these laws is one called reciprocity which is a law in photography that explains how exposures work in photography.
When you shoot in manual mode, you set your ISO (usually the lowest possible to avoid noise), the desired aperture, and set the shutter speed based on what the camera’s light meter shows you. If you understand the rule of reciprocity, then, from what your camera reads, you will be able to choose or set a variety of exposure settings by using a combination of aperture and shutter speed values and go creative to make photographs that you visualise.

Understanding reciprocity will help you master manual mode in your camera and the only limits you will face will be the widest and narrowest aperture values of the lens that you are using and the fastest shutter speed available in the camera that you are using.

What is Reciprocity Law in Photography?
Reciprocity is a law in photography that refers to the relationship between the shutter speed and aperture value.
Here,
- Shutter speed is the length of time the shutter remains open to let light into the camera and,
- Aperture is the opening of the lens' diaphragm through which light passes and the aperture value + focal length determines the diameter of the aperture opening on the lens.
Let us get some basics right before getting into the inverse relationship between shutter speed and aperture value.
You can vary the amount of light entering the camera in two ways:
- By controlling the aperture
- By controlling the shutter speed.
Exposure depends on the intensity of light and the amount of time the light is let into the camera to fall on the sensor. So,
| Exposure | = | Intensity of Light x Time |
So this is nothing but,
Exposure = Intensity of light passing through the lens and falling on the sensor/film x The amount of time light is let through the lens to fall on the sensor/film
- Intensity or amount of light passing through the lens can be controlled by changing the aperture value of the lens
- Amount of time the light is allowed to pass through can be controlled by shutter speed.
In the above equation, you can notice the reciprocal relationship between the intensity of light passing through the lens and the amount of time the light is let through the lens to fall on the sensor.
Here is how to understand the reciprocal relationship:
To maintain the same exposure, if the intensity of light increases, the amount of time the light is let through needs to decrease and if the intensity of light decreases, the amount of time the light is let through needs to increase.
This means,
- if the aperture is wide or larger (allows a greater amount of light), the shutter speed needs to be fast or shorter (exposure time is decreased) and
- if the aperture is narrow or smaller (allows a lesser amount of light), the shutter speed needs to be slow or longer (exposure time is increased).


In aperture values f/1.4, f/8 and f/16, the numbers 1.4, 8. 16 are called f/stop values and we will see why they are called so in the sections below.
For a particular exposure, an f-stop value will have a corresponding shutter speed that will result in a correctly exposed image for a given ISO value.
Just remember:
- Small f-stop value means wide aperture – requires faster or shorter shutter speed to control the amount of light to get the right exposure.
- Large f-stop value means narrow aperture – requires slower or longer shutter speed to allow enough light to get the right exposure.
If one goes up, the other goes down and hence they are inversely related.
Here is the relationship between the shutter speed and aperture value:
“One stop increase in aperture value (for example f/2.8 to f/2) is equivalent to the doubling of time when the shutter is open (for example from 1/1000s to 1/500s).”
That is, opening the aperture by a stop (example f/2.8 to f/2) and doubling the shutter speed (example (1/1000 sec to 1/500 sec), both will increase the amount of light entering the camera by one stop (doubling the amount of light or twice as much light). Applying both will overexpose the image.
In order to maintain the correct exposure, the reciprocal law needs to be applied.
Aperture and shutter speed work reciprocally. If the aperture is narrowed, the shutter needs to be opened for a longer period of time and if the aperture is widened, the shutter needs to be open for a shorter period of time to get the same exposure.
Here are some images to explain the above:

Shot at f/2, 1/4000 sec and ISO 200

Shot at f/2.8, 1/2000 sec and ISO 200

Shot at f/4, 1/1000 sec and ISO 200
Note: What we see from the above images is, when we close down the aperture by a stop, that is from f/2 to f/2.8 or from f/2.8 to f/4, we need to compensate for the stop of light by lengthening the shutter speed. That is from 1/4000 sec to 1/2000 sec or from 1/2000 sec to 1/1000 sec.
We can see that doing so maintains the proper exposure. The only thing that changes is the depth of field. Shooting at f/4 has a greater depth of field compared to shooting at f/2 and you also get a slightly sharper image in some cases.
Note: One stop of light refers to either double or half the amount of light and depends on whether there was an increase or decrease in the amount of light.
Also note: Shutter speed depends on the lens and aperture value that you are using and that gives the exposure value.
Here is how to explain the above using examples:
Aperture is the opening of the lens (diameter of the lens opening controlled by aperture blades) – the smaller the number, the wider the aperture is open. For example, f/2.8 is a wider aperture compared to f/11 which means, f.2.8 will let in more light compared to f/11.
One stop increase in aperture size means, opening the aperture wider to let in double the amount of light. For example, opening the aperture from f/8 to f/5.6 will let in double the amount of light that was let in at f/8 or opening the aperture from f/4 to f/2.8, will let in double the amount of light that was let in at f/4.

Effect of aperture on exposure, shot at a focal length of 100mm, 0.5 sec exposure and ISO 100
Note: If you are confused about what a stop of aperture is, we have explained it in detail towards the end of this article
Shutter speed is the amount of the time the shutter remains open in order to let in light into the camera. The more the amount of time it is open, the more the amount of light that enters the camera. For example, a shutter speed of 1/100s is longer compared to a shutter speed of 1/500s which means, a shutter speed of 1/100s will let in a lot more light compared to a shutter speed of 1/500s.
Doubling of shutter speed means, increasing the amount of time the shutter is open by two times. For example for a correct exposure for a given aperture and ISO value, if the shutter speed was 1/500s, then doubling the shutter speed means, increasing the amount of time the shutter is open by 2 times = 1/250s. A shutter speed of 1/250s will let in double the amount of light that was let in at 1/500s for a given aperture value and iso value.
Let us simplify this concept now by using the example below:
Consider the following scenario:
You are shooting an image at f/4 at a shutter speed of 1/500s and ISO value 200. If you want a shallower depth of field, you will need to open the aperture to f/2.8 or wider if your lens allows that. Let us assume you have a lens that can open wide up to f/2.
So, if you change your aperture from f/4 to f/2.8, this means that the aperture will now let in double the amount of light at a shutter speed of 1/500s and ISO 200, which means your image will be overexposed. In order to get the exposure right, you will need to change your shutter speed.
F/4 to f/2.8 is a stop increase in aperture size. To compensate for this, you will need to halve the shutter speed by a stop. So instead of 1/500s, you will need to shoot at 1/1000s to get the same exposure.
The above is an example of how aperture and shutter speed are inversely related and how they affect the amount of light entering the camera (reaching the sensor).
To summarise the example,
Exposure made at f/4, 1/500s and ISO 200 = Exposure made at f/2.8, 1/1000s and ISO 200 |
The table below explains reciprocity even better:
For example, let us consider that the exposure settings for a scenario is 1/2000 of a second at aperture value f/1.4. Here is how the shutter speed will vary as the aperture is narrowed down. ISO value is constant throughout.
| Aperture | Shutter Speed | ||
| Wider Aperture | f/1.4 | 1/2000 of a second | Faster Exposure |
| f/2 | 1/1000 of a second | ||
| f/2.8 | 1/500 of a second | ||
| f/4 | 1/250 of a second | ||
| f/5.6 | 1/125 of a second | ||
| f/8 | 1/60 of a second | ||
| f/11 | 1/30 of a second | ||
| f/16 | 1/15 of a second | ||
| f/22 | 1/8 of a second | ||
| Narrow Aperture | f/32 | 1/4 of a second | Longer Exposure |
In the above table, assume that the exposure was correct at f/1.4, 1/2000 of a second. Then for each full stop increase in aperture value, the exposure time is doubled.
Depending on one of the above values (aperture value or shutter speed), the other is adjusted to balance the exposure.
You may think, why should I change aperture values and/or shutter speeds when one combination gives the correct exposure. Read further to find why!
Why would you choose narrow or wide apertures?
Aperture controls depth of field. Depending on what you are looking to photograph or achieve in your images, you will need to choose your aperture values wisely. For example, landscape and some types of long exposure images will require narrow apertures for a greater depth of field whereas portraits, still life, etc. would require wider apertures in order to achieve shallow depth of field.

Combined depth of field diagram with examples to make it simpler.
The following images will explain how changing aperture from f/4 to f/8 and f/16 increases the depth of field. While closing down the aperture, the shutter speed was changed following the law of reciprocity to maintain the same exposure.

Shot at f/4, 1/1000 sec, ISO 200

Shot at f/8, 1/250 sec, ISO 200

Shot at f/16, 1/60 sec, ISO 200
When should you choose faster or slower shutter speeds?
Shutter speed is used to freeze motion. In situations where you need to capture fast actions, and freeze movements, you will need to use a faster shutter speed whereas in situations where you need to capture movements you will need to use a slower shutter speed.
So for example, shooting at f/16, 1/125s is different from shooting at f/5.6, 1/1000s. Although the exposure is the same, the depth of field and movements recorded will vary greatly.
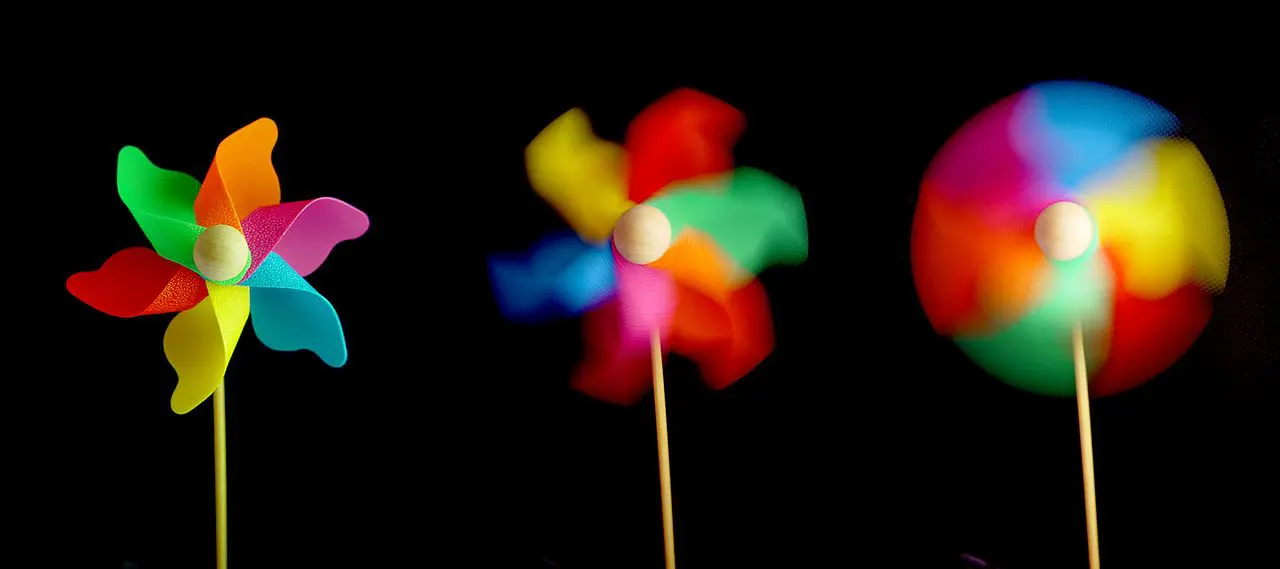
The following set of images will explain this! A red coloured toy car was allowed to move behind my panda figurine. Here is what you observe:
- First image: At shutter speed 1/250 sec, the movement of the toy car is frozen
- Second image: At 1/30 sec, you can see the movement of the toy car in the background
- Third image: At 1/8 sec, the movement of my toy car was recorded for a longer period of time and so it appears long and faint.
In all three scenarios, I wanted to control the shutter speed to freeze/show movement. So I had to close down the aperture to lengthen the shutter speed for the same exposure.

Shot at f/2, 1/250 sec, ISO 1600

Shot at f/5.6, 1/30 sec, ISO 1600

Shot at f/11, 1/8 sec, ISO 1600
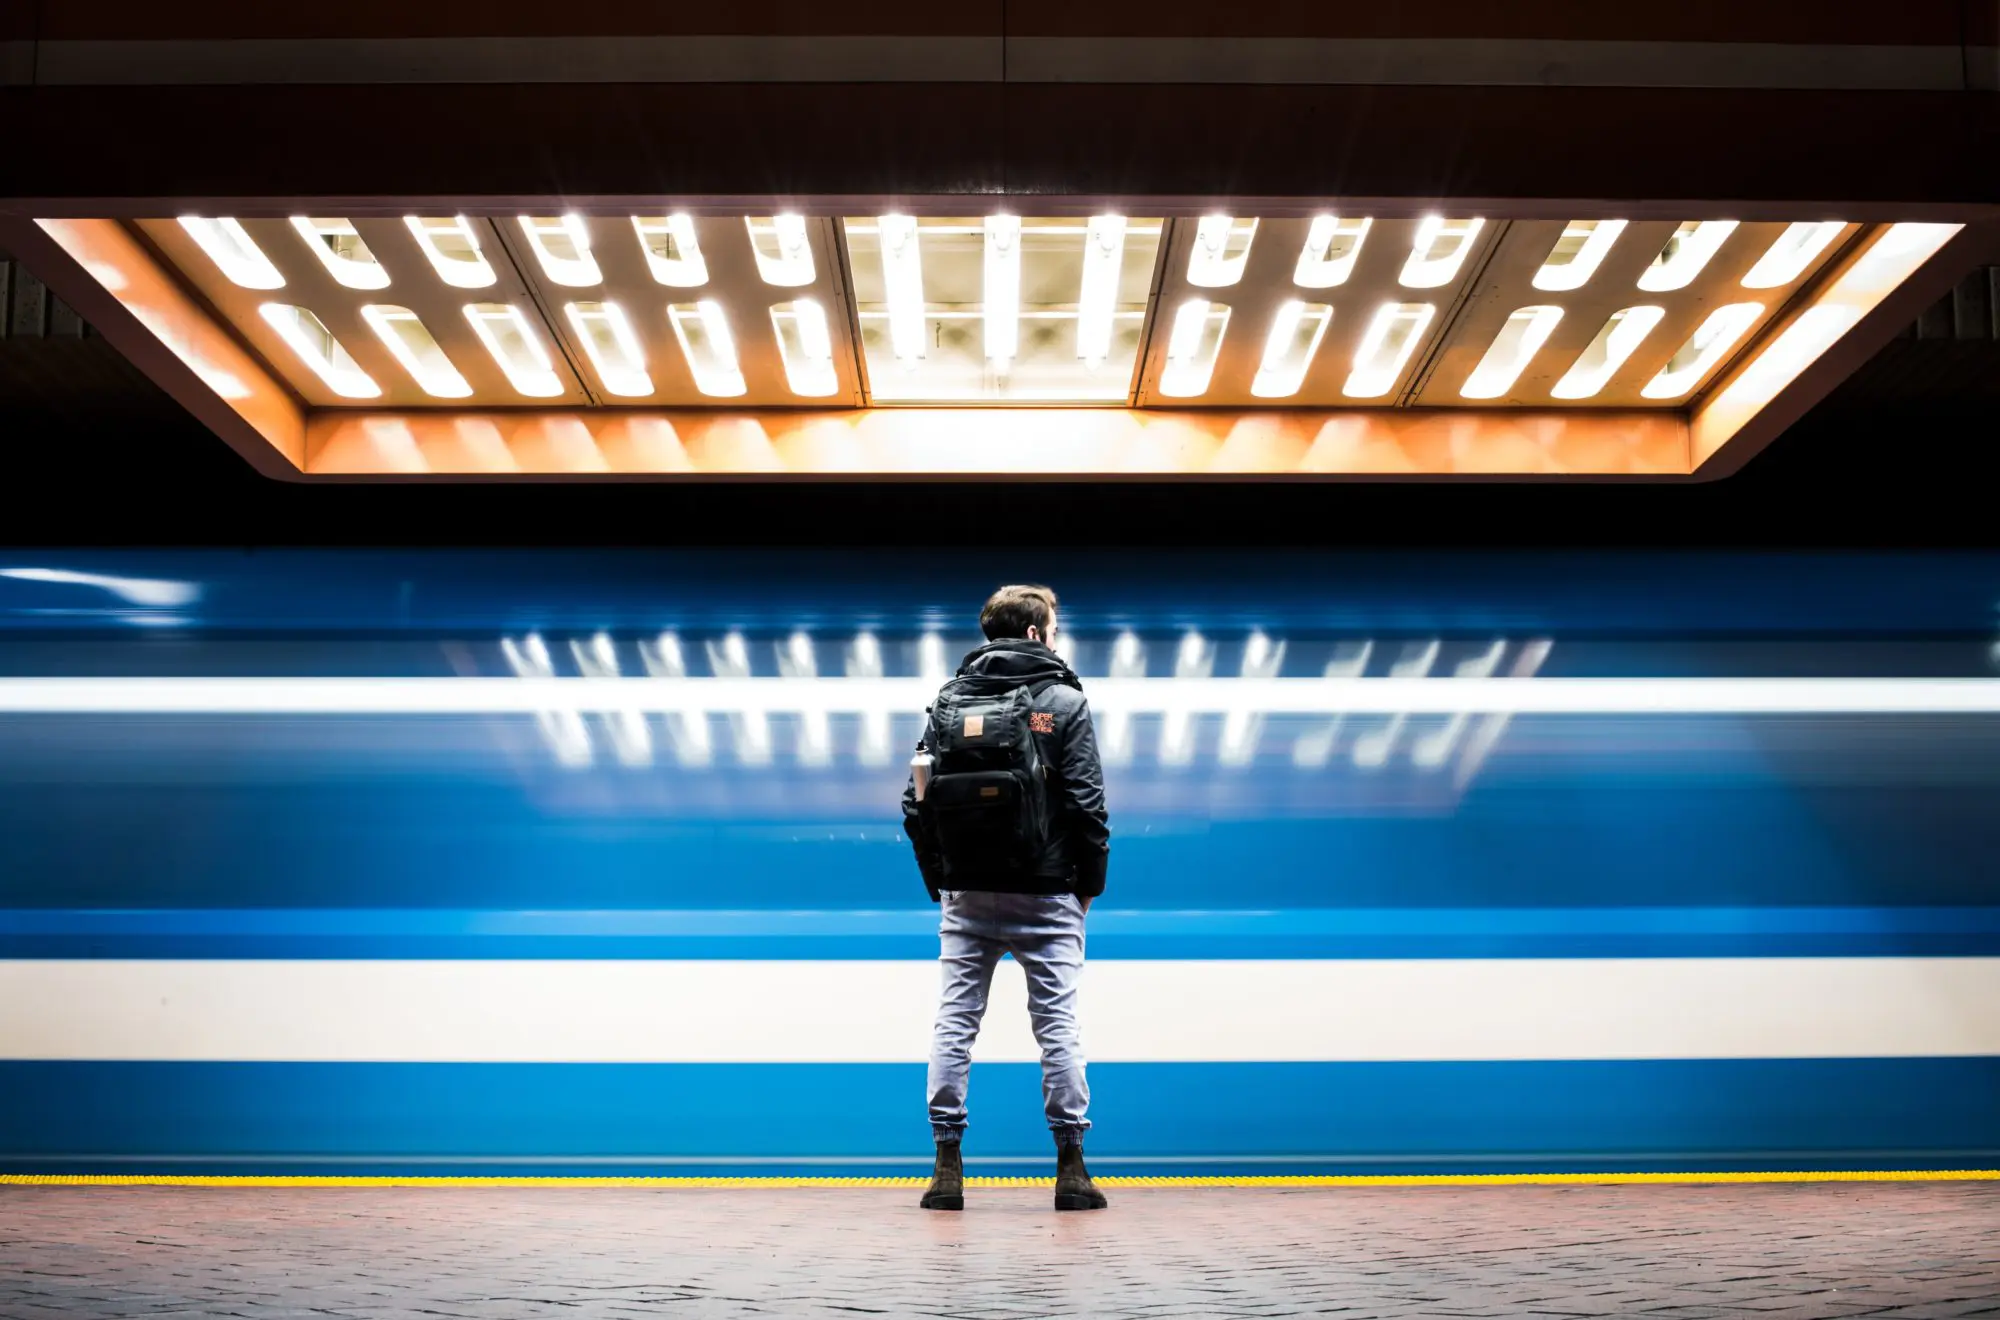
Here is another set of images where the lights in the background were moved to record the movements at various shutter speeds. Similar to the example above, the aperture was closed by 2 stops in each exposure to double the exposure by two times and record movement.
- First image: At shutter speed 1/125 sec, the movement of the light is frozen
- Second image: At 1/30 sec, you can see slight movement of lights on the right
- Third image: At 1/8 sec, the movement was recorded for a longer period of time with longer light trails.

Shot at f/2.8, 1/125 sec, ISO 1600

Shot at f/5.6, 1/30 sec, ISO 1600

Shot at f/11, 1/8 sec, ISO 1600
What if you still do not get the correct exposure with the settings you experiment with?
There may be times, especially in low light conditions when you have the aperture at the widest opening with an acceptable shutter speed and you are still not able to get the desired exposure for a lower ISO value. You may not get the look you are visualising, you may not be able to capture the movements or you are unable to shoot handheld with those settings when you do not have a tripod, and at these times you can experiment with the ISO settings. Increase or decrease the ISO values to change the sensor's sensitivity to light. This again works in stops.
ISO is the sensor’s sensitivity to light and works in stops. The higher the ISO value, the higher the sensor's sensitivity to light, the lower the ISO value, the lower is its sensitivity to light.
At times when shutter speed becomes too slow to get the desired exposure, it can be compensated by increasing the ISO value. Doubling the ISO means doubling the brightness by doubling the sensor's sensitivity to light. For example, ISO 200 records double the brightness compared to ISO 100. The standard values of ISO are 100, 200, 400, 800, 1600, 3200, up to as far as your camera allows. Doubling the ISO value is an increase in 1 stop of exposure.
In the images below, you can see how the loss of one stop of light due to narrowing the aperture by a stop was compensated by doubling the ISO. This is for illustration purpose only as an increase in ISO would not be required for bright scenes like this.

Shot at f/2, 1/4000 sec, ISO 200

Shot at f/2.8, 1/4000 sec, ISO 400

Shot at f/4, 1/4000 sec, ISO 800
You can see how the loss of light due to closing down of the aperture can be compensated by increasing ISO in stops. Increase ISO values only when required as it can introduce unwanted noise in your images and sometimes ruin the image.
Having a good understanding of the exposure triangle will help you understand how these three factors – aperture, shutter speed and ISO – work to get the exposure right.

Let us consider the scenario below:
You have a landscape scene that you need to photograph and you are using a lens with no image stabilisation and do not have a tripod. In order to have a deeper depth of field you choose an aperture value of f/8 and for best image quality, you choose an ISO value of 100. You now dial in a shutter speed based on the light meter and it reads 1/15s.
But Oh No – 1/15s is no good – so what will you need to do to get a sharp image by avoiding blur due to camera shake?
If in order to get a sharp image, we need to have a shutter speed of at least 1/60s, which is a 2 stops increase in speed compared to 1/15s (1/15s -> 1/30s -> 1/60s). We also need to keep using our chosen aperture value of f/8 because depth of field is very important in landscape photography to get the whole scene in focus. The only option left is to increase the ISO value and (because of the reciprocity rule) it needs to be increased by 2 stops.
So in order to get the correct exposure, the ISO value needs to be increased from ISO 100 by two stops, which is ISO 400 (ISO 100 -> ISO 200 -> ISO 400).
Reciprocity Failure:
With digital cameras, reciprocity works fine except for the fact that noise can be an issue when aperture value is narrowed down and exposure times are longer. Long exposures can lead to digital noise which look more like grains in the film.
With film users, reciprocity sometimes fails due to film reacting unevenly to exposure. When the exposure times are longer than a few seconds, the reciprocity law fails leading to situations where extra exposure times may be necessary to get the exposure right. The amount of extra time required is quite difficult to tell as it depends on the film used and needs to be found by experimenting with several exposures with different exposure times. This is called reciprocity failure.
With some black and white film, exposure of more than 1 or 2 seconds may sometimes cause reciprocity failure whereas, in colour film, exposures greater than 20 seconds can result in colour shifting. There are colour shifts in slide films as well when the exposure is sometimes greater than 5 seconds. These can vary and are dependent on the film used.
Useful Questions and Answers For Understanding Reciprocity:
1. How to calculate the stops of aperture?
In order to understand how to stops of aperture work, let us consider two circles.
Circle 1:
Diameter of a circle (d) = 10mm
Radius of this circle (r) = 5mm
Area of the circle = π r2 = 3.14 x 5 x 5 = 78.5 mm²
Now consider circle 2 whose diameter is √2 times (√2 = 1.414) the diameter of circle 1.
Circle 2:
Diameter of a circle (d) = 1.414 x 10mm = 14.14mm
Radius of this circle (r) = 7.07mm
Area of the circle = π r2 = 3.14 x 7.07 x 7.07 = 156.95 mm² = 157 mm²
Compare the areas of circle 1 and circle 2. Circle 1 with diameter 10mm has an area of 78.5 mm² and circle 2 whose diameter is √2 times diameter of circle 1, which is 14.14mm has almost twice the area compared to the area of circle 1.
Consider areas of circle 1 and circle 2 as two different apertures. The opening with an area in circle 2 will let in twice the amount of light compared to the light let in by an opening with the area in circle 1. This is how full stops of apertures work.
If you need to change the aperture value of the lens by a stop, you need to multiply the f-stop value by √2 which is 1.414. That way you will narrow the aperture opening by a stop.
Let us consider a lens with a maximum aperture of f/2. To calculate full f-stops for that lens, multiply the f-stop value by 1.414 which is the square root of 2.
- In f/2, 2 x 1.414 = 2.82 = 2.8, which gives f/2.8
- In f/2.8, 2.8 x 1.414 = 3.95 = 4, which gives f/4
- In f/4, 4 x 1.414 = 5.65 = 5.6, which gives f/5.6 and so on…
Similarly, to calculate 1/2 stops, multiply by 1.189 (fourth root of 2) and to calculate 1/3rd stops, multiply by 1.12 (sixth root of 2).

You may see that these values will be rounded off in your camera when you set the aperture values.
2. How does an increase in one stop (narrowing) of aperture value reduce the amount of light passing through by one stop?
This is very similar to what we discussed in the previous section.
Consider a lens with a specific focal length and aperture values. When we set f-stop values in the camera, we are actually setting the diameter of the aperture on the lens. So, for a given focal length (f) and f-stop number (s), the diameter of the aperture is calculated as,
Diameter (d) = Focal length / f-stop number = f/s
Consider a lens of focal length (f) 60mm and aperture f/2:
Here the f-stop number (s) = 2
Therefore,
Diameter of aperture opening (d) = f/s = 60mm/2 = 30mm
Therefore radius of aperture (r = d/2) = 15mm
Calculating the area of the aperture opening considering it to be almost a circle,
Area of circle = π r2
Substituting for π = 3.14 and r = 15mm,
Area = 3.14 x 15 x 15 = 706.5 mm²
Note: The shape of the aperture depends on the shape and number of aperture blades.

Now consider the same lens with a focal length of 60mm and aperture closed down by a stop, that is f/2.8
Diameter of aperture opening (d) = f/2.8 = 60mm/2.8 = 21.43mm
Therefore radius of aperture (r) = 10.72mm
Calculating the area of the aperture opening now at f/2.8,
Area = 3.14 x 10.72 x 10.72 = 360.84 mm²
Now consider the lens with the same focal length of 60mm and aperture closed down by a stop, that is f/4
Diameter of aperture opening (d) = f/4 = 60mm/4 = 15mm
Therefore radius of aperture (r) = 7.5mm
Calculating the area of the aperture opening now at f/2.8,
Area = 3.14 x 7.5 x 7.5 = 176.63 mm²
When you compare the area of the aperture openings for f/2, f/2.8, f/4, you can see that they are all roughly half the size with each stop narrowing of aperture. This is why for each stop of aperture, the shutter speed needs to be doubled by a stop to let in the same amount of light.
The image below illustrates the above clearly. You can roughly see the size difference in apertures and how the aperture areas are halved with each stop of increase in aperture value.

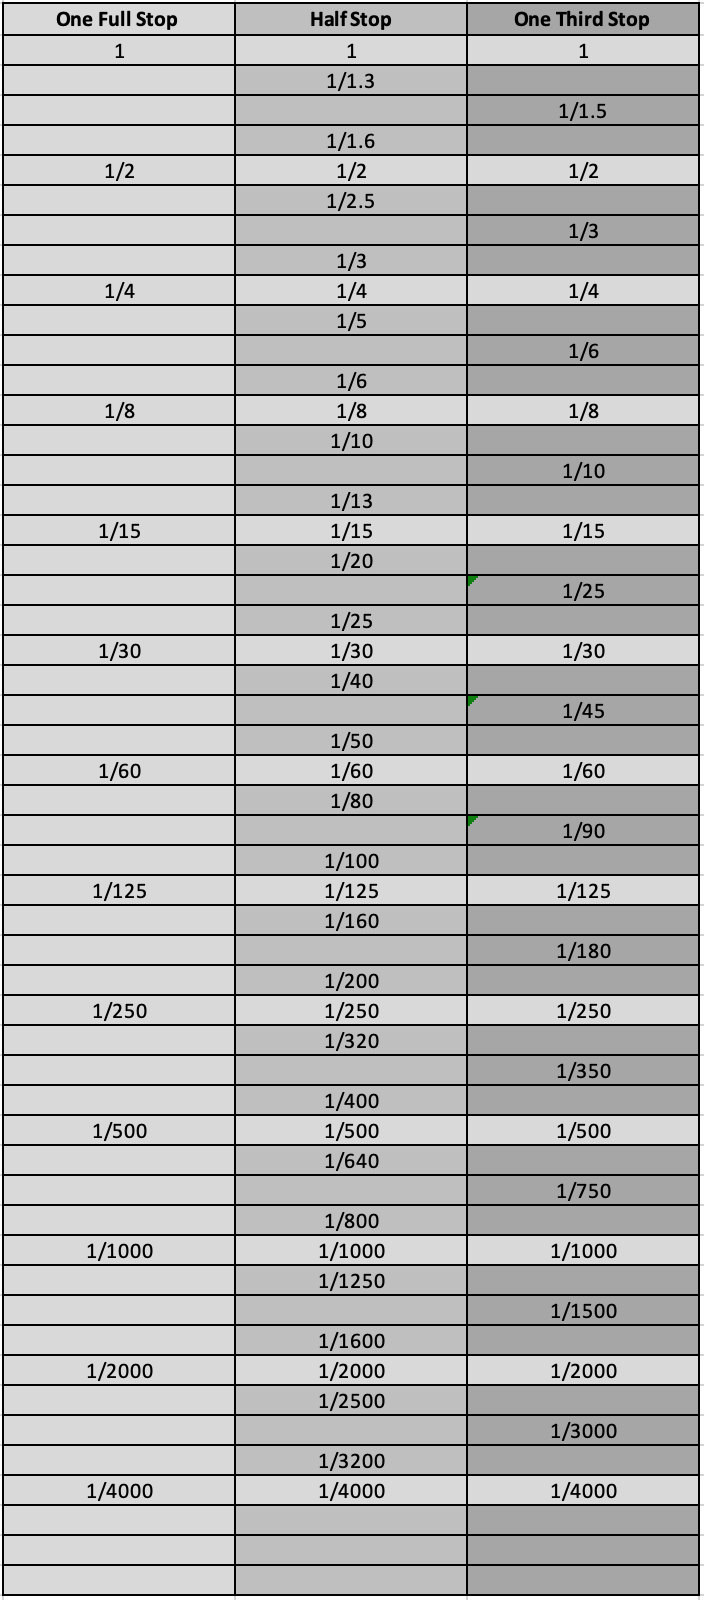
3. Do cameras allow for only a full stop of aperture, shutter speed and iso values?
For ease of explanation, we are talking in terms of full stops of light, which means twice or half the amount of light. Cameras allow for half and one-third increase/decrease in stops and this can vary between cameras. We have already discussed the 1/2 and 1/3 stops increase/decrease in aperture value in the previous sections.
In order to calculate 1/2 stops of aperture values, multiply by 1.189 (the fourth root of 2) and to calculate 1/3rd stops, multiply by 1.12 (the sixth root of 2).
With shutter speed and ISO values, this is easier. See the tables below. However, with each stop increase in ISO, only the sensitivity of the sensor is increased. Increasing ISO value does NOT let in an extra amount of light through the lens. It is just electronic amplification.

What are your thoughts on the above? Do you apply reciprocity law in your photography? Share your thoughts and experiences with us in the comments section below.


4 Comments
Oh, Dahlia…!
Your tution on Reciprocity has finally taught me about manual photography fundamentals in the most simplified and understandable way that no bookshop or library textbooks has ever done. Well done and keep it up!
Hi Francesco, thank you for reading and glad that you found this helpful 🙂
I found your article well written and helpful – thanks. One thing stuck out, however, you mentioned wanting to stay at base ISO early on in the article to avoid noise. The decrease in dynamic range as ISO goes up is equally important as the SNR. Sometimes more important when the dynamic range of the scene crosses the dynamic range curve.
True! Thank you for that Dave 🙂