This is a guest post from Chris Gin – you can see more from Chris at his Website, Flickr and Facebook.
As a landscape photographer I rely heavily on filters. The ones I use most often are my graduated neutral density (GND) filters which help balance the intensity between the sky and foreground. However another favourite of mine, and one which I don't use nearly as often as I should, is my B+W ND110 netural density (ND) filter.
B+W ND110 Filter
This is much like regular ND filters (which are used to reduce the amount of light hitting the camera's sensor) except it's a much stronger version. The strength of typical ND filters range from 1-stop to 3-stops, meaning they reduce the amount of light by 2 to 8 times. The B+W ND110 filter is a massive 10-stops which means it reduces the amount of light by about 1000 times!
Why Use ND Filters
The main reason for using an ND filter is to allow you to use a longer shutter speed than you would normally be able to achieve in any given light. For example, if the exposure without a filter was ISO 100, f/11, 1/40 sec then the same shot using a 3-stop ND filter would be ISO 100, f/11, 1/5 sec. Longer exposures allow you to blur moving objects, such as clouds or water, giving an effect that a lot of photographers desire. When the light is relatively low to start with, the common lower-strength ND filters are usually strong enough to achieve the desired result.

Reasons For Using Stronger Filters
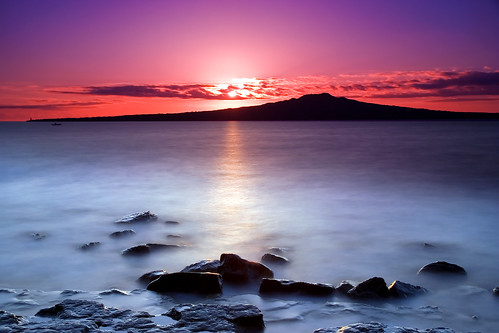
There are times when you may want to use shutter speeds much longer than the light will allow, and the only way to achieve this is by using a strong ND filter such as the B+W 10-stop. The below photo was taken just after sunrise, when the sun was already well above the horizon. Under these conditions, a 3-stop ND filter would barely slow the shutter speed enough to capture the movement of the water.
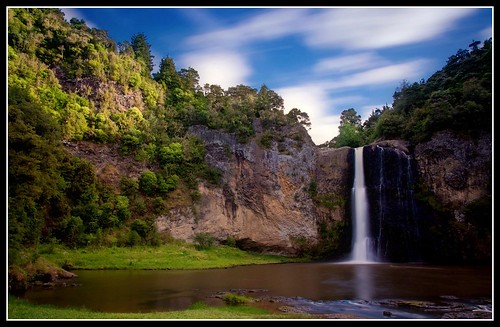
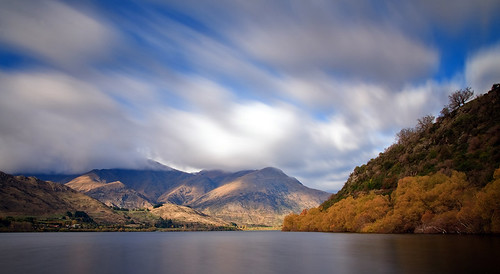
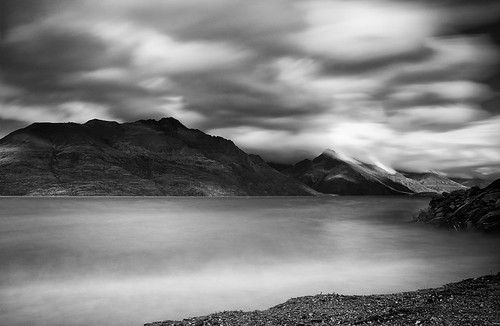
Another major benefit of such a strong filter is that it allows you to shoot long exposures during the day. Normally landscape photographers wait until the golden hours to take photos as that is when the light is at its best, however a strong ND filter offers creative opportunities outside of those hours. I find this filter especially useful when there are fast-moving clouds.
A side-effect of my particular filter is that sometimes it produces a magenta cast on the image. Usually this can be removed during post-processing, however at other times the effect is quite pleasing and adds colour to an otherwise flat image.
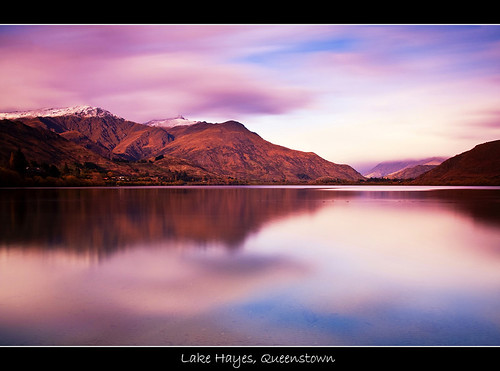
Another option is to convert to black and white which often suits these types of shots.
Usage
These filters are often compared to welding masks because they are so strong you can barely see anything through them. This provides a bit of a challenge when taking a photo because the filter is too dark for the camera to automatically focus or take a meter reading. To get around these problems, these are the steps I take when using the 10-stop filter:
- Compose the shot as normal.
- Focus in auto-focus mode, then switch the lens to manual focus. This will prevent the camera from trying to auto-focus once the filter is on.
- If using a GND filter, position it as per normal.
- Take a meter reading and/or test shot. Take note of the shutter speed, and multiple by 1000. Remember this value.
- Screw on the 10-stop filter. (If using a GND filter, take this off first, then put it back on after)
- Switch the camera to Manual mode and set it to the shutter speed from step 4. If more than 30 seconds, use Bulb mode.
- Take the shot.
As you can see it takes a bit of effort to use the filter, but the results can be worth it.
Other Brands
The other major brand of 10-stop ND filters is Lee who have their Big Stopper . The main difference between the B+W and Lee version is that the B+W ones are screw-on while the Lee is a slot-in. A slot-in filter requires an adapter and holder, however the benefit is that it is much more convenient to use, especially when stacking other filters on top of the ND. When I use a GND filter in conjunction with the B+W ND110, it can be a bit cumbersome to set up and would be much less hassle with the Lee filter.
I'm not aware of any other manufacturers that produce 10-stop filters, however both Hoya and Singh-Ray produce reasonably strong ones. Singh-Ray's Vari-ND and Light Craft's Fader ND also produce variable strength ND filters, which I have not tried personally.
Summary
A strong ND filter is another tool to consider adding to your kit. It's not something you'll use every time, but it can give you some creative options when you may not otherwise be shooting. Don't forget to see our guide to the best photo printer for getting these amazing images off your screen and onto your wall in print form too.
Check out more photos from Chris Gin at his Website, Flickr and Facebook.


22 Comments
good post Chris, sums up the ten-stoppers well. Just so you know, other manufacturers do make 10-stop ND filters – I’ve got one made by Heliopan.
Thanks Jake, good to know.
I use two polarisers on top of each other. That way I have a variable neutral density filter.
Very, very nice examples.
Fantastic article and great images…I can’t wait to switch to slot-in filters. The screw-ons are a bit more convienent to transport but stacking can be an issue when you’re using a few screw-ons at once; too much vignette sometimes!
Very interesting article. I have to buy some filters and try this out. Thanks guys!
Nice! Thanks!
Nice intro to ND filters and good use of examples. I currently only have a polarizing filter, but would very much like to use a ND filter.
Very useful advise. Thanks!
I’ve been using one of these for some time, but I haven’t quite got right the post-processing to remove the red tones (usually I convert to b&w). How do you remove the redness?
In LIghtroom there is a Tint slider that you can play with to remove that color cast
Good information here. The only issue I have is with pictures such as the 35-second exposure, where the use of a graduated neutral density filter creates a garishly unrealistic picture. I’m amazed at how many photographers go this route…it becomes a bit tiresome.
Just like HDR, not everyone likes the result. I guess is a matter of personal taste, some people like to see a faithful representation of the world, some others have vivid imagination and imagine something more and find it more aesthetic.
I want to understand step 4 better. I am a bit dumb, I guess. “Take a meter reading and/or test shot. Take note of the shutter speed, and multiple by 1000. Remember this value.” so, if my shutter speed is 60, then what do I do, after I multiply it by 1000? Very confused… and probably very stupid. ;o(
If your original shutter speed is 1/60th of a second, then times 1000 is 1000/60ths. 1000 divided by 60 is 16.67 or about 17seconds. This is the new exposure you need to use with the filter in place.
This is a great explanation. I plan to go get my first set of good nd filters because of it.
Great examples.
Love your shots, Chris.
You have inspired me to return to my old town, Auckland, but this time with my photographer’s eyes & full-frame.
I too use Hi-Tech NDs and ND Grads.
They also have a 10-stop ND, but I find it gives such a BLUE CAST, which I cannot remove in ACR (Camera Raw).
I believe I am also resigned to B&W conversions.
Like your response!
I have the Lee and B&W 10 stop filters and I believe I prefer the Lee. I’ve only had the Lee kit for about 6 months but its nice to clip it off to focus without having to screw it on. Be aware the Big Stopper has a 6 month waiting list!
If you happen to be using a newer Canon DSLR (tried it on my 5DMkIII so far), with my Big Stopper on, in live mode, the live view conveniently adjusts to let you see through the lens. Zoom in, and focus away!
A friend of mine who uses a Nikon system pointed it out to me (go figure) and I’ve never looked back.
I also use 10 stop Lee Big Stopper for doing architectural photos to get a more detailed look in brick etc. it also prevents those that may walk thru the scene during long exposures to become visible on the file.