Just so you are not misled in any way, let me make it clear that this won’t be a Photoshop tutorial on using any particular sharpening method. It will provide general guidelines on sharpening methods, but the main goal will be to help you understand the sharpening process better. It will show you what exactly sharpening does to an image, and how it's accomplished.
What Does Sharpening Do to an Image?
Sharpening, as a post-process effect doesn’t really sharpen the images. It creates the illusion that it does, by exaggerating the edges, but it can’t bring back missed focus nor effectively negate motion blur. Yes, Photoshop has some deblurring options, some work better than the others, but nothing will replace getting the image nice and sharp in-camera.
So the sharpening does really just exaggerate the edges by locally increasing contrast along the edges that are masked (hence the unsharp mask). The edges affected are determined by the Radius and Threshold parameters when sharpening, and the amount of sharpening is adjusted using the Amount setting. If you want to see the sharpening in effect, check the picture below and see what I mean by increasing the contrast between edges.

Why Should You Sharpen an Image?
Regular sharpening, in moderate extents, is merely done to increase the punch that the details have, and to ease up the work the human eye needs to do to pick up the details. However, effective sharpening depends on the media and size of the image. Let's see an example that demonstrates this.
If you were to sharpen an image with a resolution, say, 1600 x 900, and use unsharp mask with 150% strength and say 3 pixel radius, then downscale the image for web use to, say 600 x 338. Then the sharpening with 1.125 pixel radius (you downscale the radius with the same ratio to which you downscale the image) when downscaled will create artifacts (usually dependent on the downscale engine). Therefore, if you plan on downscaling, first downscale then sharpen for better results.

The difference is really small, but when combined with other methods of image enhancement, it can add up.
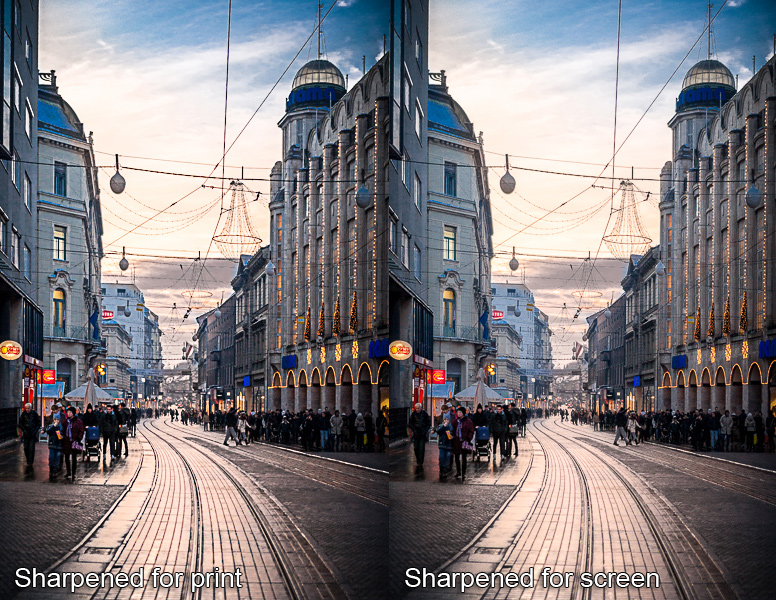
Sharpening for Screen vs. Sharpening for Print
Sharpening varies with where the image is used finally- that is, for viewing on a screen or for printing. Print generally requires a bit stronger sharpening, but it shouldn’t be overdone. If you start noticing halos or edges that have white/black outlines, then your sharpening is way too strong. The image below compares the two scenarios (click on the image for larger resolution).
Tips for Sharpening Your Photos Better
1. Many lenses, especially super-zooms, tend to lose sharpness on the edges while having a sharp center. When you sharpen an image like that you need to be aware of the issue, thus adjust your sharpening mask accordingly. I’m not aware of plugins that do the mask to the lens profile accordingly so you’ll have to do it manually by masking out the center and leave the effect more present towards the edges.
2. When you are creating HDR images, a lot of sharpening occurs in order to create that drama. Try not to overdo it, since HDR in itself with the tonal compression and all that mixing and matching introduces some halo, so if you add additional sharpening it will get worse and ruin the image completely.
3. Sometimes it is hard to notice the halo, especially if you have been staring at the screen for hours. Best thing to do is temporarily convert the image to monochrome and look away for few minutes. When you look back it should be easy to notice if there is any haloing or too much sharpening since there is no color to trick your eye.

Photo by Dzvonko Petrovski
4. Note that a wide and a large halo usually appears if you use too big sharpen radius with enough sharpening power. With small radius, something along the lines of fraction of a pixel to two pixel, the worst that can happen is to have outlines (that is technically halo as well, just it is small and gets noticeably visible with less sharpening power).
5. As you sharpen, as a downside of resolution, diagonal edges might appear jagged and blocky. Even zigzags often occur. Make sure you check for that as well and if you notice it happening try different settings, a bit larger radius with less strength or different threshold.
6. On an additional note, when you sharpen, you sharpen the noise as well. Therefore, clean the image first and sharpen later. If overdone, even an image that went through a noise filter will get exaggerated noise as well. I don’t know of any sharpening filter that doesn’t affect noise at all. You can reduce the effect by tweaking the threshold and masks, but it will never be perfect.
The key point of this article is to understand that sharpening won’t bring back missed focus, but it will create the illusion of focus and sharpness. The human eye is easily distracted, therefore if you overdo it, the sharpening becomes a distraction. And since sharpening can easily be overdone, especially if you sharpen for one size, then downscale to another. Keep your plugins under control, and keep in mind that sharpening can never replace proper focus.


3 Comments
A useful article (especially for novices) that is concise enough to almost act like a ‘flash card’ and be kept close at hand when working.
I use PSE9; one of the Elements books I read suggested sharpening to around 125 and no more. That’s what I do and it seems to work!
By the way, great article!
Can you elaborate further on sharpening and downscaling and how that would be accomplished? I used Lightroom and PS CC edition and often downscale images for clients who want to use them on social media. What kind of workflow would you propose to downscale and then sharpen? Would exporting from Lightroom and resizing but sharpening for screen be sufficient? Or are you proposing some sort of re-importing of the jpg and then sharpening again?