A lot of folks get into photography without having any type of art background or art training.
Some might be telling themselves, “Hey, I know how to use a camera. Why do I need that?”
The answer lies in one word – communication.
Just like anyone can write a paragraph, it takes the training and knowledge of becoming an author to write a paragraph that will communicate the correct message to as broad an audience as possible.
Sometimes, having a little bit of art knowledge can be just as unforgiving as having no knowledge at all.
There are different levels of artistic training- what I’m talking about here is composition.
Today, I’m going to talk about the tool of composition called, “leading lines”.
Leading lines are a basic tool of composition and represent a concept that most photographers can latch on to. There are horizontal lines, diagonal lines, vertical lines, and so on.
The problem is that many photographers don’t use leading lines properly, creatively, or even recognize when a leading line is ruining their composition. There are many opportunities for using vertical lines or horizontal leading lines in landscape or portrait photography. Or any other genre in fact – natural lines are omnipresent and you can also consider photographing man-made lines.
Let’s look at several examples of leading lines and discuss what works and what doesn’t. I’ll even include some discussion on a pretty sophisticated use of leading lines.
Leading Lines Photography Example #1 – Horizonal Leading Lines
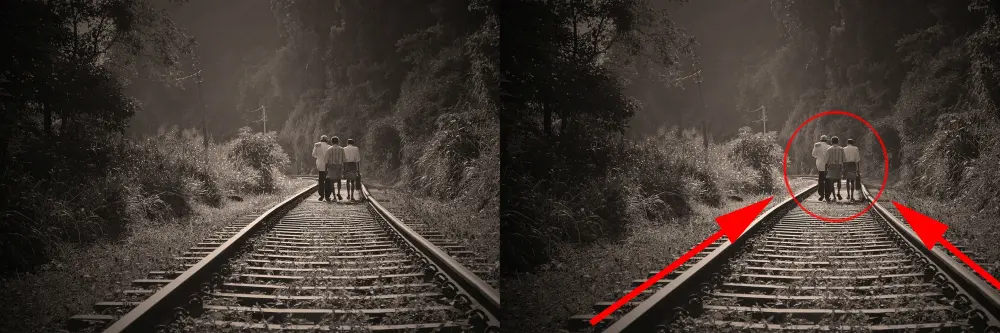
Example 1 is a very traditional use of horizonal lines in an artistic (photographic) composition. The railroad tracks are quite dominant and they form a perfect visual path leading toward the three boys that are walking.
A question to contemplate-
- How do we know that the three boys are the subjects of this photograph? Why is it not the horizontal lines – train tracks? Or, the surrounding landscape?
Before we get into answering the question- let’s look at another example of leading lines, and perhaps you’ll find the answer to that question for yourself.
Leading Lines Photography Example #2

In example 2, it’s obvious that the photographer intended for the fence to be a leading line. In fact, the photographer used the tag, “leading lines”, when the photograph was uploaded to the Internet. We have diagonal lines here.
On the right, I put in an arrow that displays one of the main problems with leading lines when you don’t understand how they work. The leading line is leading to nowhere. It’s actually leading a viewer’s eyes right off of the photograph(to the left).
You might wonder… why isn’t the leading line leading in the other direction- toward the fence posts on the right? (I think that’s what the photographer intended.)
Part of why leading lines work, as a tool of composition, is because of a geometric rule called converging lines. Another term that comes into play is called “vanishing point”. In geometry, these lines eventually meet at the vanishing point. Our brains are taught, (from the moment that we begin to learn depth perception as little toddlers), that converging lines and a vanishing point indicate distance and depth. This is a subliminal thing that our minds recognize. Artists, going all the way back to the earliest painters also recognized this, and converging lines became a basic artistic building block.
Trying to follow the line (the fence) in the other direction – goes against what your brain knows to be true. It simply will not follow that path.
If you go back to example 1- is it now apparent why the walking trio is the subject? They stand at the vanishing point for the leading lines. This gives them the ultimate dominant visual weight within the photograph. The eyes come to rest at that spot, and the boys’ presence provides meaning to the photograph.
Knowing this- begs a question…
Does the use of leading lines always have to end with the subject at the vanishing point?
No. There are different types of leading lines (horizontal lines, diagonal lines, vertical lines). Using leading lines can become quite sophisticated when you understand the concepts around them.
That’s the thing about art concepts. They’re kind of tricky. They can be quite straightforward, such as the trio walking on the train tracks, or, they can be subtle and melding into other elements of composition that change their use and meaning. Again, we can have different types of leading lines, such as horizontal leading lines, vertical leading lines, curved lines, etc.
Let’s look at a few examples like that.
Leading Lines Photography Example #3

Example #3 makes use of a primary leading line, secondary leading lines, and a third type of leading line known as a “sight line”. We have all diagonal lines here.
A question that you may ask is… “Why am I saying that the leash is leading toward the dog, and not away from the dog, like the fence was in example 2?”
Good question! There are two reasons that answer that question-
- The leash, a good example of diagonal lines, is not a converging line. It is traveling across the photograph- not “into” the photograph.
- Because it is not a converging line, the direction is established through different means. In this case, it is the use of a focal point and juxtaposition. Those additional tools of composition occur where the leash is clasped to the dog’s collar. Because that point of contact is a focal point, and it creates shape juxtaposition against the background, it carries more visual strength than the left part of the leash that extends off of the frame. It creates a flow of left to right.
Let’s go back to the question of “What’s the subject”?
Is the subject the dog? Not really. The dog is a secondary subject. The primary subject is what the dog is doing with his leg. This is reinforced through the positioning of the dog’s face and eyes. They are forming a different kind of leading line, known as a sight line. The sight line pushes a viewer’s eyes in the direction of the leg.
The dog’s activity at the leg, becomes the primary subject of the photograph. Other elements of composition that support this conclusion include the use of shape and action. At the end of the viewing experience – this is where the eyes come to rest, and the meaning of the photograph is revealed.
The blue arrows point out the secondary leading lines. Secondary leading lines work subliminally to push a viewer’s eyes in a certain direction. They are not as obvious as converging lines- yet they work subtly to “nudge’ a viewer in a direction. A vignette is a subtle leading line. It pushes a viewer’s eyes inward. In this case, the focused lines, between the bricks, push the eyes inward toward the dog.
The unfocused lines between the bricks are not secondary leading lines. Why? Being out-of-focus has drastically reduced their weight within the composition.
Leading Lines Photography Example #4

In example 4, I want you to spend a moment deciding for yourself where the leading lines are. Also mind the horizon line! I also want you to make a decision as to where you believe the viewer’s eyes should come to rest. Finally, what do you believe is the subject of this photograph?
We will come back to this toward the end of today’s post.
Leading Lines Photography Example #5

Just as an ill-placed leading line can tank your efforts, an even worse situation is not recognizing the fact that a leading line exists, and it’s not helping your photograph.
Example 5 is this scenario.
The interesting aspect to this example is that we have almost the exact same “composition” situation as in example 3- except it is working against the photograph and not for it. Leading lines in photography don't work every time.
What are the similarities between examples of leading lines 3 and 5?
- There is a horizontal leading line that is not a converging line.
- There is a focal point and a shape juxtaposition working in the photograph of leading lines.
Where did this shot go wrong while example 3 did not?
The problem here is in the placement of the elements within the shot. In example 3, all of the composition elements were pushing the eyes toward the dog and ultimately the raised leg.
In example 5, the photographer’s intended subject was the coiled rope. The problem occurs when the rope leaves the coil. At that point the rope leads into the background (a converging line – strong visual weight), where it comes to a stop at a focal point (the knot on the post), which adds more visual weight (away from the coiled rope), plus the use of a shape juxtaposition that adds even more visual weight away from the coil, before the eyes follow that last little bit of rope right off the page to the right.
Important Point: When you’re ready to take a picture. Take a moment to analyze the scene. Are you using horizontal lines or diagonal lines, and if so, are they leading in the right direction? Are there any leading lines that you didn’t notice, and they’re working against you? Could you change the camera POV to make a leading line stronger, or perhaps you need to eliminate one that’s not working?
Back to Example #4 On Leading Lines Photography

Example 4 is actually a fairly sophisticated use of leading lines. Let’s break this shot down-
- The curved lines on the road provide the strongest path into the photograph. There are several reasons for this. They are converging lines. They are very bright compared to the surrounding areas. Plus, they are the strongest representation of movement.
- The red circle is the final resting place within this photograph. This is primarily due to placement (as indicated by the rule of thirds grid) and this area is the vanishing point for the converging lines.
- The blue arrows indicate secondary leading lines. They become secondary leading lines due to motion and contrast. This point is important. A leading line isn’t necessarily “always” a physical line- just as the “sight line” in example 3 wasn’t a physical line. Try to think of leading lines more as a stream. The water flows, and the ebbs and tides of rocks (or whatever) push the water this way- and that way- sometimes hard and sometimes gentle. Your use of leading lines should help push a viewer’s eyes through your photograph- sometimes hard and sometimes gentle. The converging lines on the road (in example 4) are a hard push. The soft contrasting clouds in the sky are a soft push.
- Finally, what is the subject in example 4 of leading lines? This is actually up to interpretation for each viewer in this case. (I happen to like that.) There is no concrete information that says “THIS IS THE SUBJECT”. On the train tracks, it was obvious that the trio of boys were the subject. In example 4, it’s much more esoteric. I think the subject is the “idea” of speed. What do you think?
If you’ve enjoyed learning a bit more about leading lines, and perhaps you have an interest in composition in general, Photzy a great books on the subject. “Understanding Composition” is a great entry point into deepening your understanding of composition in photography. Leading lines are very important when it comes to composition in photography because they can instantly grab the viewer's attention. This means that vertical lines and horizontal leading lines, when used properly, can enhance your composition in no time!
This book can help push you (just like leading lines) along a path to a result! So, make sure to understand how to use vertical leading lines and horizontal leading lines to your advantage.
To sum up, leading lines in photography are something that every photographer should master.
» Click here to take a look at the guide on leading lines photography
More Resources On Leading Lines Photography:
- 19 Strong Examples Of Composing With Leading Lines Using Roads And Paths
- 12 Amazing Photos That Will Make You Appreciate Leading Lines as a Great Composition Tool
- Using Leading Lines For Captivating Composition
- How To Use Vertical Lines And Horizontal Lines To Take Your Composition To The Next Level
- 22 Landscape Photographs That Use Power Lines to Great Effect


10 Comments
so I guess this has nothing to do with that rule of third?
No Shaun. The Rule of Thirds is a different topic.
Great article, Kent – it’s an important topic and your article will be a great help. I guess the so-called “rule” of thirds, the concept of leading lines, and the notion of deciding what is the real “subject” of your photo – to avoid clutter and distraction – should form the basis of any sensible introduction to the “art” of photography.
Good point. Cheers.
A very informative and analytical article. Subjecting our own images to this type of analysis can be of great value in improving our compositions. Thanks.
Thanks. Kent
Thank you Kent- interesting analysis. I suppose the fence line in example 2 might work if the point of focus had been about two-thirds way along the fence rather than at the extreme right side- then it would go somewhere. Is the point of focus another element to be considered?
Absolutely!
One other thing to remember regarding the coiled rope idea-we read from left to right; if you have line leading away from the subject out of the picture to the right, the eye will definitely follow it due to the “left to right” inertia. It is much more difficult to bring the viewer’s eye into an image from the upper right-hand side of an image than it is to lead from the left. Kandinsky talks a bit about this idea in “Point and Line to Plane”, where he discusses the way planes are weighted, and how the eye naturally moves according to how we weight the plane. Great article, Kent.
Thanks Henry. That’s a great point!